To make turned pieces look cleaner, focus on establishing a steady sanding rhythm that follows the wood grain. Use consistent, smooth strokes with the right amount of pressure—avoiding gouges or uneven spots—and move gradually from coarse to fine grits. Keep your motions controlled and deliberate, aligning each stroke with the grain to prevent scratches. Maintaining patience and control throughout the process results in a polished, professional finish—if you want to master these techniques, keep exploring more tips and tricks.

Get business pricing on tools and workshop supplies
- Business-only prices and quantity discounts
- Tax-exempt purchasing
- Multiple users, one account, clear invoices
Key Takeaways
- Maintain a consistent, rhythmic motion aligned with the wood grain to ensure a smooth, even surface.
- Start with coarse grit and gradually use finer grits, following the natural grain for cleaner results.
- Apply steady, moderate pressure to avoid gouges and maintain control during sanding.
- Regularly check surface smoothness by feeling and inspecting under good lighting.
- Develop patience and control, focusing on deliberate strokes rather than speed for a polished finish.

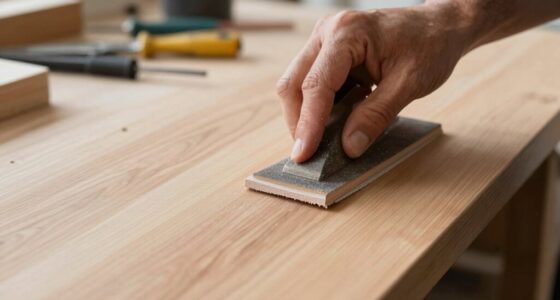
Achieving a smooth, professional finish on turned wood pieces often comes down to mastering your sanding rhythm. When you focus on the rhythm, you guarantee that the sanding process is even and consistent, which is vital for a high-quality finish. Your goal is to work with the wood grain, paying close attention to how the grain runs along the piece. Sanding against the grain can cause scratches and a rough surface, making your work look less polished. Instead, always follow the natural direction of the wood grain, which helps you achieve a cleaner, more refined surface.
Your sanding techniques are essential in bringing out the best in your turned pieces. Start with a coarser grit to remove tool marks and any rough patches. As you progress, gradually switch to finer grits, maintaining a steady, rhythmic motion. This steady rhythm helps you avoid uneven sanding and keeps the surface uniform. Keep your strokes smooth and consistent, moving along the length of the piece in the same direction as the wood grain. This consistency minimizes the risk of creating new scratches or blemishes that can be difficult to remove later. Developing a good sanding rhythm is crucial for achieving a seamless finish. Additionally, incorporating proper sanding techniques can significantly improve your results and reduce the effort needed for touch-ups. Focusing on the correct sanding pressure further enhances the quality of your work, ensuring a balanced application that avoids damage.
Maintain a steady, rhythmic motion, sanding with the grain for a smooth, uniform finish.
As you refine your finishing techniques, pay attention to your sanding pressure. Too much pressure can cause gouges or uneven spots, while too little might not remove enough roughness. Find a balance that allows you to keep the tool moving steadily without forcing it into the wood. Regularly check your progress by feeling the surface with your fingertips or inspecting it under good lighting. A well-sanded piece will feel smooth and look even from all angles. Remember, practicing consistent sanding motion can help you develop better control and achieve more predictable results over time.
Remember, your sanding rhythm influences how well the wood grain appears once finished. A steady, deliberate pace helps you avoid accidental dips or uneven spots that disrupt the visual flow of the grain. It’s all about maintaining a consistent pattern that follows the natural contours of your piece. Additionally, the technique you adopt at this stage affects how easily you’ll be able to apply your final finishing coats. Properly sanded wood reduces the need for heavy coats of finish, resulting in a cleaner, more professional look.
In the end, developing a good sanding rhythm isn’t just about speed; it’s about control and patience. When you pay attention to your technique and respect the wood grain, your turned pieces will look cleaner, smoother, and more polished. This mindful approach to sanding will elevate your craftsmanship and leave you with beautifully finished woodwork every time.
Products Worth Considering

PHILIPS Hue Smart LED Candle Light Bulb, B39, E12, 2-Pack

Philips Hue White and Color Ambiance Smart Light Starter Kit, 2 A19 Bulbs with Hub

TCL 65 Inch QM8L Series SQD-Mini LED QLED 4K Smart Google TV
As an affiliate, we earn on qualifying purchases.
Frequently Asked Questions
What Types of Sandpaper Are Best for Turned Wood Pieces?
For turned wood pieces, start with coarse grit sandpaper like 80 or 120 to smooth rough surfaces, following the wood grain and applying gentle sanding pressure. Progress to finer grits such as 220 or 320 for a polished finish. Using consistent sanding pressure and matching your sandpaper grit to the wood grain guarantees a cleaner, smoother surface. Remember, proper technique prevents scratches and reveals a professional-looking turned piece.
How Do I Prevent Uneven Sanding on Intricate Designs?
Think of your sanding tools as delicate brushes that paint smooth finishes. To prevent uneven sanding on intricate designs, follow a gentle, consistent rhythm, adapting your finishing techniques to the curves and details. Use finer grit sandpaper carefully, and consider small, flexible sanding tools for tight spots. Keep your movements steady, like a painter’s hand, ensuring each surface receives even attention and your detailed work stays flawless.
What Safety Precautions Should I Take While Sanding?
You should always wear protective gear like a dust mask and safety goggles to protect your lungs and eyes from dust and debris. Keep dust control in mind by working in a well-ventilated area or using a dust extractor to minimize airborne particles. Take regular breaks to avoid fatigue, and make sure your sanding tools are in good condition. These precautions keep you safe while achieving a smooth, professional finish.
How Can I Quickly Fix Sanding Scratches or Marks?
Ever wonder how to fix sanding scratches quickly? To do so, you can use fine-grit sandpaper or a sanding sponge to gently blend the marks into the surrounding surface. Applying finishing techniques like rubbing with a wood filler or a polishing compound can help hide imperfections. Remember, avoiding sanding hazards is key—always work with even pressure and proper safety gear to prevent further damage or injury.
What Tools Assist in Maintaining a Consistent Sanding Rhythm?
To maintain a consistent sanding rhythm, you should use quality sanding blocks and orbital sanders, which help keep your pressure steady. Regularly inspect and maintain your tools by cleaning or replacing worn-out pads and grits to guarantee smooth operation. Focus on uniform sanding techniques, moving in the same direction and applying even pressure, to produce a clean, professional finish. Proper tool maintenance and disciplined sanding techniques are key for consistent, high-quality results.
Conclusion
By paying attention to your sanding rhythm and staying consistent, you’ll notice a real difference in the cleanliness and finish of your turned pieces. It’s all about patience and technique—are you ready to elevate your craftsmanship? When you develop a steady sanding rhythm, you not only enhance the appearance but also extend the life of your work. So, why settle for just okay when you can achieve that professional, polished look every time?