

To create consistent designs using stencils and patterns, start by securing your stencil with painter’s tape or adhesive to guarantee precise placement. Use registration marks or guides for seamless pattern repetition, and focus on maintaining even pressure for clean, sharp edges. Repeating designs carefully minimizes gaps and overlaps, giving your work a professional look. Mastering these techniques helps you produce cohesive, polished projects—keep exploring to discover more tips for flawless pattern finishing.
Key Takeaways
- Secure stencils firmly with painter’s tape or repositionable adhesive to maintain consistent placement during pattern repetition.
- Use registration marks or guides to align stencil sections accurately for seamless pattern continuity.
- Reposition stencils carefully, maintaining consistent pressure to ensure uniform ink or paint transfer.
- Develop a rhythm or sequence for pattern application to minimize gaps and overlaps, ensuring cohesive designs.
- Calibrate colors and materials consistently to achieve uniform pattern fidelity and a polished, professional finish.
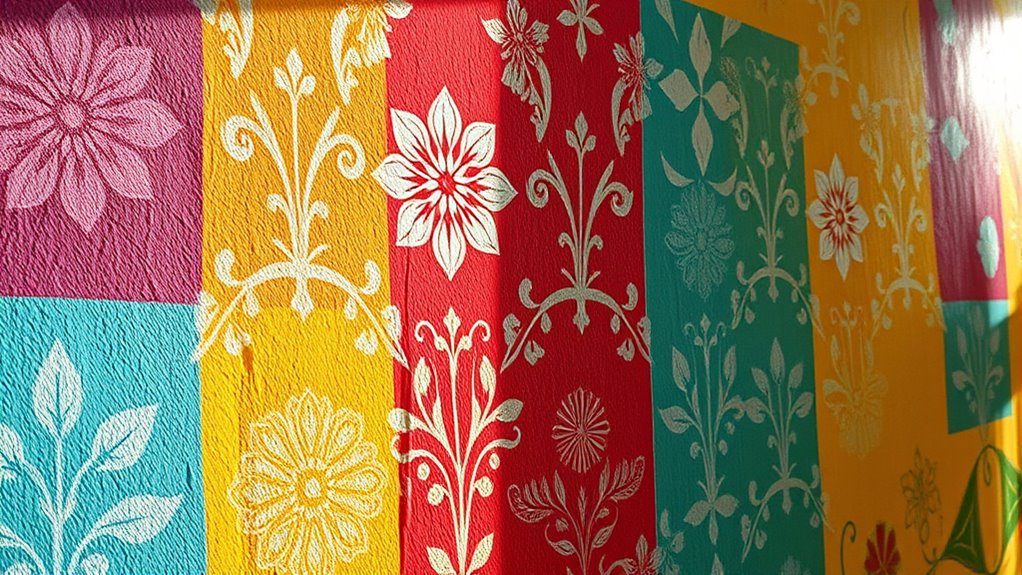
Using stencils and patterns is a tried-and-true way to achieve consistent, professional-looking designs across your projects. When you want uniformity in your work, mastering the art of design transfer becomes essential. By carefully transferring your chosen pattern onto your surface, you guarantee each detail remains true to the original design. This process involves outlining or applying a medium that captures the pattern’s intricacies, allowing you to replicate the design accurately. Whether you’re decorating walls, furniture, or crafts, a precise design transfer prevents smudges and irregularities, giving your finished piece a polished appearance. Proper color calibration can further enhance the fidelity of your pattern reproduction, ensuring the colors match your original vision.
Pattern repetition is another critical aspect when working with stencils and patterns. Repeating a pattern seamlessly creates a cohesive look and can make large surfaces appear more intricate without requiring complex, freehand work. To achieve perfect pattern repetition, you need to align your stencil carefully, ensuring edges match up precisely at each seam. Some stencils include registration marks or guides to assist with alignment, which can save you time and frustration. When you practice pattern repetition, you develop a rhythm that minimizes gaps and overlaps, resulting in a smooth, continuous design. This consistency enhances the overall aesthetic and lends a professional finish to your project.
Consistent pattern repetition creates a seamless, professional look with minimal gaps and overlaps.
Using stencils simplifies pattern repetition, especially when working on large surfaces. Instead of trying to freehand each element, you can focus on maintaining consistent alignment and pressure, which guarantees uniformity. It’s important to secure your stencil firmly in place, perhaps with painter’s tape or repositionable adhesive, so it doesn’t shift during the process. Carefully moving the stencil to the next position, aligning it with the previous pattern, allows you to maintain the integrity of your design. This technique not only saves time but also reduces mistakes, as you’re working with a guided template rather than freehand drawing.
Furthermore, understanding how to effectively do design transfer and pattern repetition empowers you to create complex, eye-catching designs with ease. It enables you to scale your ideas without losing quality or consistency, which is especially valuable in projects requiring multiple repetitions. As you become more comfortable with these techniques, you’ll find that your ability to produce symmetrical, harmonious patterns improves considerably. Whether you’re embellishing a single piece or covering an entire wall, mastering these skills ensures your designs look deliberate and professional. In short, using stencils and patterns thoughtfully transforms your artistic vision into polished realities, all while maintaining high precision and consistency across your work.

Findbuytool Carbide Inserts cutters (15x15x2.5mm-30°-R150-4R0.5) Insert for Woodworking Helical Cutter Head Tools, 10 Pcs (10)
{Product Contains}:10pcs Carbide Insert Knife 15x15x2.5mm-30°-R150-4R0.5 for Helical Cutterhead.
As an affiliate, we earn on qualifying purchases.
Frequently Asked Questions
Can Stencils Be Reused Multiple Times Without Losing Quality?
Yes, stencils can be reused multiple times without losing quality if you consider stencil durability. To guarantee consistent paint adhesion and prevent wear, clean your stencil thoroughly after each use and store it properly. Using the right type of paint and applying gentle pressure also helps maintain the stencil’s integrity. With proper care, your stencils stay in good shape, allowing for repeated use without sacrificing the quality of your designs.
What Materials Are Best for Making Custom Stencils?
If you want durable custom stencils, plastic sheets are your best bet because they’re sturdy and reusable. For example, a small business used craft foam for intricate designs, finding it easy to cut and affordable. Both materials are excellent; plastic sheets offer longevity, while craft foam is perfect for detailed, temporary stencils. Choose based on your project’s complexity and how often you plan to reuse your stencil.
How Do I Fix Mistakes When Using Stencils?
When you make a mistake with your stencil, quickly stop and assess the issue. For mistake correction, gently wipe the area with a damp cloth or use a small brush with paint remover if needed. To prevent future errors, maintain your stencil by cleaning it after each use and storing it properly. Proper stencil maintenance guarantees clean lines and reduces the chances of mistakes, making your projects look professional.
Are There Eco-Friendly Options for Stencil Paints?
Research suggests eco-friendly paints, especially those made from natural pigments, are a great choice for stencil work. You can find paints labeled as eco-friendly that contain fewer toxic chemicals, making them safer for the environment and your health. These natural pigment-based paints offer vibrant colors without harmful VOCs. By choosing these options, you guarantee your projects stay sustainable while maintaining beautiful, consistent designs with your stencils.
How Can Patterns Be Scaled for Different Project Sizes?
To scale patterns for different project sizes, you should use pattern resizing techniques. Start with digital files that allow easy resizing through scalable printing, so you can adjust the pattern dimensions without losing quality. This way, you can create larger or smaller versions tailored to your project needs. Always check the pattern’s resolution and test print before applying it to ensure accuracy, making your designs consistent across various sizes.

POWERTEC 14.3mm Carbide Inserts Cutter Knives for Spiral & Helical Cutterheads - Fits Wen PL1326, JT630H & Rikon 25-130H, Tungsten Carbide Replacement Blades for Planer and Jointer (14301)
INCLUDES: (10) Carbide Insert Blades
As an affiliate, we earn on qualifying purchases.
Conclusion
When you master stencils and patterns, you discover the secret to creating designs so flawless they seem almost magical. Every stroke becomes a masterpiece, turning ordinary projects into extraordinary works of art. With consistency, you’ll feel unstoppable—like a creative wizard wielding unstoppable power. So go ahead, embrace these techniques and watch your designs transform from simple to sensational, leaving everyone breathless. Your artistic empire awaits—don’t hold back; let your creativity explode beyond limits!
Indexable Carbide Insert Knife 14.3x14.3x2.0mm-50° 2-Edge Replacement Cutter for Cutech Tool Rikon Carbatec and Most Planer Jointer Helical Cutterheads, 10 Packs
Standard Cutter Size: 14.3mm square with straight corners 2mm thick,2 indexable cutting edges, 50 degree cutting bevel. Inserts...
As an affiliate, we earn on qualifying purchases.
15mm Standard Square Straight Tungsten Carbide Replacement Cutter Inserts Knives 15mm x 15 x 2.5mm for Woodworking Spiral Helical Planer Head and DIY Wood Lathe Turning Tools 10pcs
Standard Size-15mm(length)X15mm(width)X2.5mm(thickness) square straight with 4 edges,30 degree cutting angle.
As an affiliate, we earn on qualifying purchases.