To add depth and texture to wood surfaces with carving tools, follow the grain patterns and surface imperfections to create dynamic, tactile effects. Use different tools like chisels and gouges to vary depth and direction, emphasizing natural grain or adding rugged elements. Subtle carvings produce understated effects, while bold reliefs catch light and create contrast. Maintaining a clean workspace enhances precision. Keep exploring to discover how mastering these techniques can transform plain wood into expressive, textured art.
Key Takeaways
- Follow the wood grain to carve natural patterns that add visual depth and movement.
- Vary carving depth and tools to create subtle or bold textures on the surface.
- Incorporate imperfections like knots or cracks as focal points for rustic appeal.
- Use fine lines, reliefs, and grooves to produce tactile and dramatic surface effects.
- Maintain workspace cleanliness and dust control for precision and safety during detailed carving.

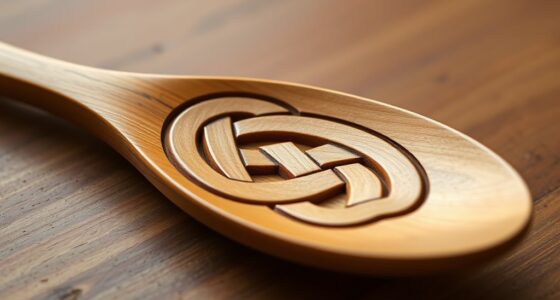
Have you ever wondered how to give your wood surfaces a unique, textured look? One effective way to achieve that is by using carving tools to manipulate the grain patterns and surface imperfections. Carving allows you to transform a plain piece of wood into a work of art, adding depth and character to your project. When you start this process, the first thing to contemplate is how the natural grain patterns of the wood can be accentuated or altered. These patterns, which are the result of the wood’s growth rings and fiber arrangement, can be emphasized through careful carving, creating a dynamic visual effect that makes each piece stand out. By following the grain, you can create flow and movement, giving your surface a lively, textured appearance.
Incorporating surface imperfections into your design is also essential. These imperfections—knots, cracks, and uneven patches—are often seen as flaws, but with the right carving techniques, they can become focal points that add authenticity and rustic charm. Carving around or into these irregularities allows you to highlight their uniqueness rather than hide them. For example, gently carving around a knot can make it pop as a feature, transforming what might seem like a flaw into an aesthetic asset. Similarly, deliberately accentuating cracks or irregularities with specific carving patterns can add a tactile element, inviting touch and further enhancing the textured feel.
As you work with carving tools, keep in mind that controlling the depth and direction of your cuts is key to creating the desired surface texture. Shallow cuts will produce subtle surface variations, perfect for a soft, understated finish. Deeper carving, on the other hand, can create bold reliefs and pronounced textures that catch light differently across the surface. Experimenting with different tools—chisels, gouges, and veiners—enables you to manipulate the surface in various ways, whether you want fine lines that mimic natural grain or deep grooves that give a rugged aesthetic. Additionally, understanding how filtration methods can remove airborne particles enhances your awareness of maintaining a clean workspace, which is essential when working with fine carving dust and debris.

SakerNeo Deluxe Wood Carving Kit, 25 Piece Wood Carving Tools with Thick Leather Storage Bag,Wood Whittling Tools -Ideal Woodworking Tools and Hobbies for Beginners Enthusiasts Gift DIY
***18+ Only – Age Verification Required 25-PREMIUM WOOD CARVING TOOLS FOR EVERY PROJECT:This comprehensive wood carving kit includes…
As an affiliate, we earn on qualifying purchases.
As an affiliate, we earn on qualifying purchases.
Frequently Asked Questions
What Safety Precautions Should I Take When Carving Wood?
When carving wood, you should wear safety goggles to protect your eyes from flying debris and guarantee proper ventilation to avoid inhaling dust. Keep your workspace well-ventilated and work in a clean area to prevent accidents. Always use sharp tools carefully, and handle carving tools with control. Taking these precautions helps prevent injuries and keeps you safe while adding depth to your wood surfaces.
Which Types of Wood Are Best for Texturing?
You should choose soft, fine-grained woods like basswood or pine for texturing. These woods act like a blank canvas, allowing your carving techniques to dance smoothly over their surface without tearing or splintering. The wood grain guides your tools with ease, helping you create intricate textures and depth. With these ideal surfaces, your carvings will come alive, revealing rich layers of detail that captivate and inspire.
How Do I Choose the Right Carving Tools?
You should choose carving tools based on your project’s detail level and the carving techniques you plan to use. Opt for sharp, fine gouges for intricate textures and broader chisels for larger surface work. Consider the wood’s hardness and your comfort with tools. Good tool selection guarantees precision and ease, helping you achieve the desired depth and texture. Practice different techniques to find what works best for your style.
Can Textured Surfaces Be Sealed or Finished?
You can definitely seal or finish textured surfaces; don’t let the cat out of the bag! Choose from various sealant options like polyurethane, lacquer, or tung oil, depending on your desired look and durability. Finishing techniques such as brushing, wiping, or spraying can enhance the texture and protect your work. Just remember, sealing adds longevity and brings out the depth, making your carved details pop and stand the test of time.
How Do I Repair Mistakes in Carved Wood?
When you make a mistake in carved wood, start by gently sanding the area to smooth out any imperfections. If needed, apply wood filler to fill deeper flaws or gaps, then allow it to dry completely. Once dry, sand the area again to blend it seamlessly with the surrounding surface. Use fine-grit sandpaper and precise sanding techniques to guarantee your repair looks natural and polished.
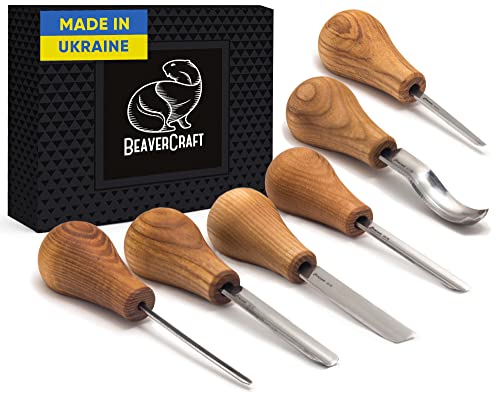
BeaverCraft Wood Carving Gouges Kit SC05 – Wood Carving Chisels Set with Palm Gouge & Flat Straight Chisel, Rounded Short Bent, V-chisels – Whittling Knives, Tools for Beginners and Profi Carvers
Wood Carving Gouges Chisels Kit Built for Comfort: Featuring lightweight Ashwood handles, these palm tools are ergonomically shaped…
As an affiliate, we earn on qualifying purchases.
As an affiliate, we earn on qualifying purchases.
Conclusion
By mastering carving tools, you transform plain wood into a canvas of depth and character. Think of your surface as a blank page waiting for your story—each carve adds a new chapter, bringing your project to life. With patience and creativity, you’ll craft textured masterpieces that invite touch and admiration. Remember, every cut is a brushstroke in your woodworking masterpiece, turning simple wood into a textured tapestry rich with personality and charm.

Wood Carving Kit, 24Pcs Wood Carving Tools with Storage Bag, Wood Whittling Knife Kit with 4pcs Templates & 6pcs Basswood Blocks for DIY Beginners
[24Pcs Complete Set] – Our wood carving kit provides everything you need to start your carving journey: 4pcs…
As an affiliate, we earn on qualifying purchases.
As an affiliate, we earn on qualifying purchases.

AUGSUN Wood Carving Knife Set, 20 PCS Wood Carving Kit Carbon Steel Wood Hand Carving Tool for DIY Sculpture Carpenter Experts Beginners
Material: Wood carving knives are made of quality carbon steel and electrolytic coating, wood whittling kit features a…
As an affiliate, we earn on qualifying purchases.
As an affiliate, we earn on qualifying purchases.