To master chip carving patterns, start with careful layout planning by sketching your design to visualize spacing and pattern flow. Control your knife angles precisely—typically between 30° and 45°—to create clean lines and uniform chips. A steeper angle allows for fine detail, while a shallower one removes larger areas quickly. Consistent angles and thoughtful pattern flow ensure balanced, attractive designs; keep exploring to access even more expert tips.
Key Takeaways
- Proper layout planning involves sketching designs to visualize chip placement, spacing, and pattern flow before carving.
- Consistent knife angles, typically 30° to 45°, are essential for uniform chip size and clean lines.
- Adjusting knife angles for different pattern sections enhances detail and control during carving.
- Understanding traditional motifs and symmetry helps create balanced and harmonious patterns.
- Systematic removal of chips along layout guides results in precise, decorative designs with a professional finish.

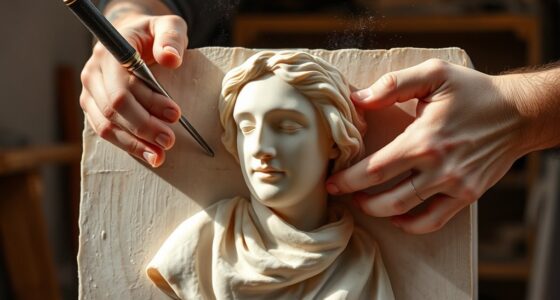
Chip carving patterns transform simple pieces of wood into intricate works of art through precise removal of surface material. When you delve into layout and knife angles, you’re engaging with a craft that combines artistry with technical skill. To start, understanding the techniques overview is essential. You’ll find that chip carving involves systematically removing small chips of wood along a pattern line, creating detailed designs. The key is controlling your knife’s angle to carve clean, crisp lines without splitting the wood or damaging your pattern. The knife angle typically ranges from 30 to 45 degrees, depending on the detail and depth you want to achieve. A steeper angle offers more control for fine lines, while a shallower angle helps in removing larger chips quickly. Maintaining a consistent angle throughout your work ensures uniformity and sharpness in your pattern, giving your piece a professional finish.
Knowing the historical origins of chip carving can deepen your appreciation for the craft. This technique dates back centuries and has roots in European folk art, especially in regions like the Netherlands, Germany, and Scandinavia. Historically, it served practical purposes—decorating household items, furniture, and religious artifacts—while also showcasing regional craftsmanship. Over time, chip carving evolved from a utilitarian craft into an art form, with patterns becoming more elaborate and decorative. Understanding these origins can help you grasp the significance of layout, which was often inspired by traditional motifs and cultural symbols. Many of the classic patterns you see today trace back to these ancient roots, emphasizing symmetry, geometric shapes, and natural motifs.
When you plan your layout, you need to think about the pattern’s flow and symmetry. Sketching your design first helps visualize the spacing and how the chips will interact. Keep in mind that the layout isn’t just about aesthetics; it also guides your knife angles and depths. As you carve, gently follow your pattern lines, adjusting your knife angle as needed to suit different sections of the design. For instance, sharper angles may be better for tight curves, while more open angles work well for larger, sweeping areas. Consistency in your technique and an understanding of the underlying pattern will help you produce balanced, harmonious results.
LAGUNA CNC ROUTER CREATOR VACUUM HOLD DOWN KIT
These compact Vacuum Pods are made from phenolic resin, each with its own vacuum seal. Each pod is...
As an affiliate, we earn on qualifying purchases.
Frequently Asked Questions
How Do I Choose the Right Knife for Chip Carving?
You should choose a knife based on your project needs and comfort. Look for a tool with the right blade angles, typically around 30 to 45 degrees, for precise cuts. Consider knife selection that offers sharp, durable blades and comfortable handles. Smaller blades work well for detailed work, while larger ones are better for broader cuts. Test different knives to find the one that feels best for your chip carving style.
Can Chip Carving Patterns Be Customized or Only Pre-Designed?
You can customize chip carving patterns just as easily as you use pre-designed ones, embracing pattern flexibility and expanding your creative options. With customization options, you can modify existing designs, combine different elements, and create entirely unique patterns that reflect your style. This flexibility allows you to experiment, develop your skills, and produce personalized artwork, making your chip carving projects truly one-of-a-kind rather than limited to only predefined templates.
What Safety Precautions Should I Take While Carving?
You should always wear protective gear, like gloves and safety glasses, to shield your hands and eyes from potential injuries. Make certain your workspace is well-lit, organized, and free of distractions to maintain workspace safety. Keep your carving tools sharp to prevent slips, and carve on a stable surface. Taking these precautions minimizes accidents, making your chip carving experience safer and more enjoyable.
How Do I Repair Mistakes in Chip Carving Patterns?
Did you know that nearly 30% of chip carvers correct mistakes regularly? To fix errors, carefully use a fine chisel or gouge for mistake correction, removing the affected chips gently. For pattern adjustments, lightly sand or scrape the area and re-carve. Take your time, and don’t be afraid to redo sections—patience ensures your design stays sharp and clean. Mistakes happen, but proper correction keeps your work flawless.
What Types of Wood Are Best Suited for Chip Carving?
You should choose soft hardwoods like basswood or pine for chip carving because they have a fine, even wood grain that makes carving easier. These woods also have a lower carving density, meaning the material isn’t too tough to work with. Avoid hard or dense woods like oak or maple, as their tight grain and high density can make chip carving more difficult and increase the risk of mistakes.

PGFUN CNC Vacuum Chuck Fixture Plate Workpiece Clamping Table Vacuum Workholding System for Machining Center, Lathe, Milling, Engraving Machines (600 x 400mm)
Upgraded Rapid Vacuum Fixture Table: Unlike traditional vacuum fixture plates, this new vacuum fixture table eliminates the time-consuming...
As an affiliate, we earn on qualifying purchases.
Conclusion
By mastering layout and knife angles, you’ll elevate your chip carving designs. Imagine you’re creating a floral pattern on a wooden panel; adjusting your knife angle slightly can add depth and detail, making the petals pop. Practice different layouts and angles to discover what works best for your style. With patience and precision, you’ll craft intricate patterns that showcase your skill and creativity, turning simple wood into stunning art.

PGFUN CNC Vacuum Chuck Fixture Plate Workpiece Clamping Table Vacuum Workholding System for Machining Center, Lathe, Milling, Engraving Machines (300 x 500mm)
Upgraded Rapid Adsorption Plate: compares with most vacuum plate fixtures on the market, it does not need sealing...
As an affiliate, we earn on qualifying purchases.

PGFUN CNC Vacuum Chuck Fixture Plate Workpiece Clamping Table Vacuum Workholding System for Machining Center, Lathe, Milling, Engraving Machines (500 x 300mm)
Upgraded Rapid Vacuum Fixture Table: Unlike traditional vacuum fixture plates, this new vacuum fixture table eliminates the time-consuming...
As an affiliate, we earn on qualifying purchases.