
To master pyrography, focus on choosing the right temperature for different effects—higher heat for shading and lower for fine lines. Keep your strokes steady and consistent to create clean, professional designs. Use proper tips tailored for your desired detail, and regularly clean and maintain your tools to prevent residue buildup that affects accuracy. Prioritize safety by working in ventilated spaces and wearing protective gear. With these tips, you’ll craft impressive artwork and discover more techniques along the way.
Key Takeaways
- Adjust temperature settings based on material and desired effect for optimal burning and control.
- Use different strokes (e.g., shading, outlining) to add depth and detail to your pyrography artwork.
- Maintain a consistent hand movement and pressure to achieve clean, uniform lines and shading.
- Select appropriate tips (fine, broad, shading) to suit specific design elements and effects.
- Regularly clean and condition your tools to ensure smooth operation and accurate temperature regulation.

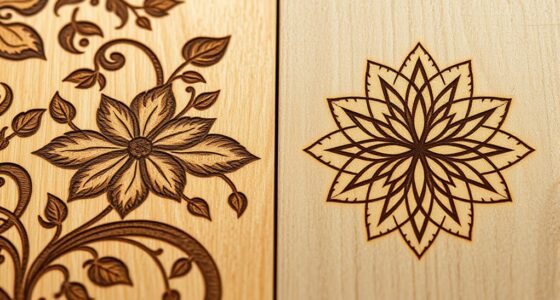
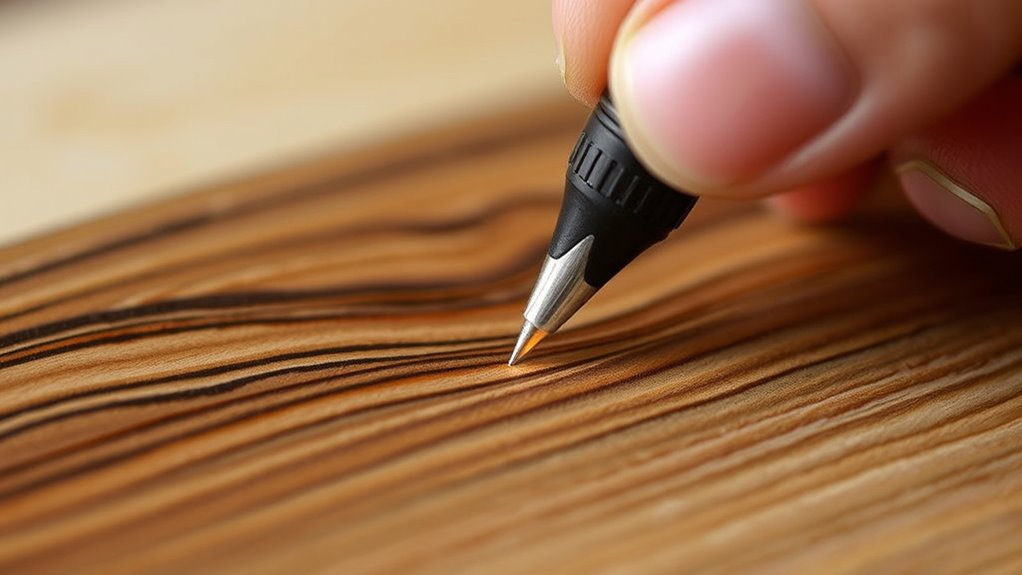
Have you ever wondered how artists create intricate designs on wood and leather? The secret often lies in pyrography, a craft that uses heated tools to burn detailed patterns into surfaces. To excel at this art form, you need to master not just your design skills but also understand the importance of tool maintenance and safety precautions. Properly caring for your pyrography tools ensures they perform consistently and last longer, while safety measures protect you from potential hazards like burns or fumes. Before you begin, always check your equipment, clean the tips regularly, and store your tools in a safe, dry place. Keeping your tools in top condition means you won’t have to fight against uneven burns or inconsistent lines, which can ruin a project. Remember, a well-maintained tool heats evenly and responds predictably to your strokes, making your work more precise and enjoyable.
Safety precautions should never be overlooked. Always work in a well-ventilated area to avoid inhaling smoke and fumes generated during burning. Use a heat-resistant surface to protect your workspace, and keep flammable materials away from your tools. Wearing protective gear, like safety glasses and a mask, can help shield your eyes and lungs from tiny particles and fumes. Keep a fire extinguisher nearby, just in case, and never leave your hot tools unattended. When handling the pyrography pen, hold it firmly but gently, and avoid touching the heated tip. It’s easy to get distracted, but staying attentive prevents accidents. Also, unplug your tools after use and allow them to cool completely before storing or cleaning. Following these safety precautions creates a safer environment for your craft and helps you develop good habits that keep you safe over time.
Getting familiar with tool maintenance and safety measures empowers you to work confidently and produce cleaner, more detailed designs. Regularly inspect your tips for signs of wear or buildup, and replace or clean them as needed to maintain ideal performance. Use the right tips for different effects—fine points for delicate lines, broader tips for shading—and switch them out carefully to avoid damage. When you’re finished, always turn off and unplug your tools, and clean the tips with appropriate materials to prevent residue buildup. By staying vigilant about maintenance and safety, you can enjoy pyrography as a safe, rewarding hobby that results in beautiful, professional-looking artwork. Remember, the key to mastering pyrography isn’t just about artistry but also about respecting your tools and keeping yourself safe throughout every step of your creative process.
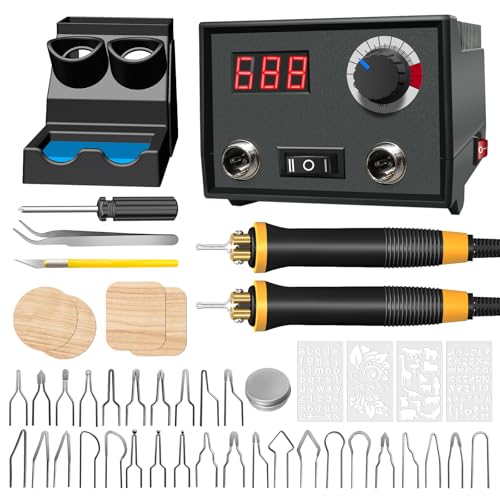
FIRElood Wood Burning Tool, Wood Burner kit Pen 25~750℃, Wood Burning kit with Digital Thermometer Temperature Adjustable Temperature, 2 pyrographic Wood Burning pens, 30 Wood Burning Pen Tips
DIGITAL ADJUSTABLE TEMPERATURE WOOD BURNING AND IRONING MACHINE: The wood burning kit is suitable for 110V voltage,The highest…
As an affiliate, we earn on qualifying purchases.
As an affiliate, we earn on qualifying purchases.
Frequently Asked Questions
What Safety Equipment Is Recommended for Pyrography?
You should always wear safety gear like heat-resistant gloves and a dust mask to protect your hands and lungs from fumes and sparks. Safety equipment such as protective goggles shields your eyes from potential splatters or debris. Make certain of good ventilation in your workspace, and consider using a fire-resistant apron. Taking these precautions helps prevent burns, inhalation of harmful fumes, and other accidents, making your pyrography experience safer and more enjoyable.
How Do I Choose the Right Wood for Pyrography?
Imagine discovering the perfect wood for pyrography—your choice hinges on grain selection and wood treatment. You should pick softwoods like basswood or cherry, which have fine, even grains for clean lines. Make certain your wood is properly treated—sanded smooth and free of oils or finishes—so your pyrography tools glide effortlessly. This combination helps you achieve crisp designs and reduces burn marks, making your artwork stand out with professional quality.
Can Pyrography Be Performed on Materials Other Than Wood?
Yes, you can perform pyrography on alternative materials like leather, cork, and gourds. Before starting, make sure to prepare the surface properly by cleaning and smoothing it to guarantee even burning. Use the right temperature settings for each material to avoid damage. Keep in mind that different surfaces react uniquely, so experiment with scrap pieces first to achieve the best results.
How Do I Fix Mistakes or Dark Spots in Pyrography?
To fix mistakes or dark spots in pyrography, start by gently sanding the area with fine-grit sandpaper to remove excess ink or burn marks. You can also use a light touch with a white or colored gel pen to cover dark spots or blend mistakes. For more precise mistake correction, consider carefully re-burning or lightening the area with a lower temperature. Always test on scrap material first to prevent further damage.
What Are Some Beginner-Friendly Projects to Start With?
You should start with simple designs like basic shapes, initials, or small images, which allow you to practice control and shading without feeling overwhelmed. These projects make great personalized gifts, adding a special touch. Focus on clean lines and steady strokes, and don’t rush. As you gain confidence, you can experiment with more detailed patterns. Starting simple helps you build skills while creating meaningful, personalized items.

YIHUA 930-IV Pyrography Wood Burning Pen Kit Adjustable Temperature, Power Switch, Heat Deflector, Rubber Grip with 10 Pyrography Tips, 2 Wood Pieces, Flip-Up Pen Stand, for Woodburning DIY Crafts
14-IN-1 Wood Burning kit – Package includes YIHUA 930-IV Pyrography Pen, 10 Pyrography Tips, 2 Unfinished Wood Pieces…
As an affiliate, we earn on qualifying purchases.
As an affiliate, we earn on qualifying purchases.
Conclusion
So, after all this talk about temperature settings and perfect strokes, you’d think pyrography is some secret art only masters can master. Turns out, the real magic is just a bit of patience—and maybe a little stubbornness. Who knew that burning designs into wood could be so simple? Now, go ahead, embrace the scorched perfection. Remember, the more you burn, the closer you get to… well, burning out. Happy pyrography!
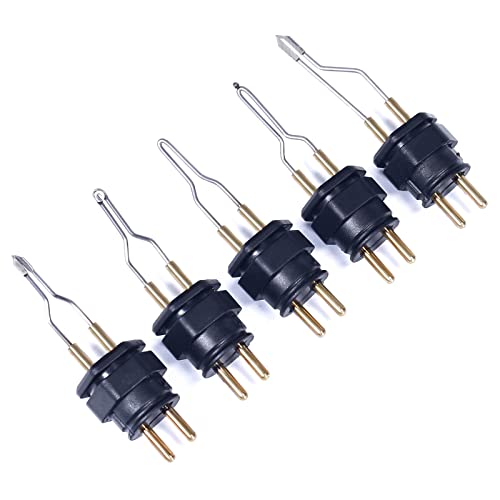
WEP Quick-Change Pyrography Tips Set ONLY Compatible with WEP 939-IV Pyrography Station (5 Pieces)
WEP Quick-Change Pyrography Tips Set (5 Pieces) is ONLY Compatible with WEP 939-IV Pyrography Station.
As an affiliate, we earn on qualifying purchases.
As an affiliate, we earn on qualifying purchases.

The Art & Craft of Pyrography: Drawing with Fire on Leather, Gourds, Cloth, Paper, and Wood (Fox Chapel Publishing) More Than 40 Patterns, Step-by-Step Projects, and Expert Advice from Lora S. Irish
Design Originals-The Art & Craft Of Pyrography
As an affiliate, we earn on qualifying purchases.
As an affiliate, we earn on qualifying purchases.