To repair damaged edges using banding and veneer tape techniques, start by measuring and cutting the banding to fit seamlessly. Carefully clean the surface, then evenly apply a high-quality adhesive with a brush or roller. Press the banding or veneer tape firmly into place, ensuring there are no air bubbles. Use clamps for a tight bond during curing, and trim or sand the edges afterward for a smooth finish. Continue to explore these steps for a durable, professional repair.
Key Takeaways
- Measure and cut banding or veneer tape precisely for a seamless edge fit.
- Thoroughly clean surfaces to ensure optimal adhesive adhesion.
- Apply adhesive evenly with a brush or roller, then press firmly to remove air bubbles.
- Use clamps during curing to ensure a tight, durable bond.
- Trim or sand edges after adhesive sets for a smooth, professional finish.

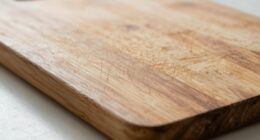
Have you ever noticed a chipped or worn edge on your countertops, furniture, or tools? When you see that kind of damage, it can be frustrating, but the good news is that you don’t need to replace the entire piece. Instead, you can focus on edge repair techniques like banding and veneer tape to restore the appearance and protect the surface. The key to a successful repair starts with understanding edge damage and choosing the right adhesive selection.
Edge damage often occurs from everyday wear and tear, accidental impacts, or prolonged use. Small chips, scratches, or worn finishes not only look unsightly but can also compromise the integrity of the surface if left unaddressed. To fix this, you need an adhesive that provides a strong bond while remaining flexible enough to withstand regular use. Selecting the right adhesive is essential—some glues are too rigid and can crack over time, while others might not bond well to the materials involved. For most wood or laminate surfaces, a high-quality contact cement or a specialized veneer adhesive works best. These adhesives offer excellent bonding strength, quick setting times, and durability.
Choosing flexible, strong adhesives like contact cement or veneer glue ensures durable, lasting edge repairs.
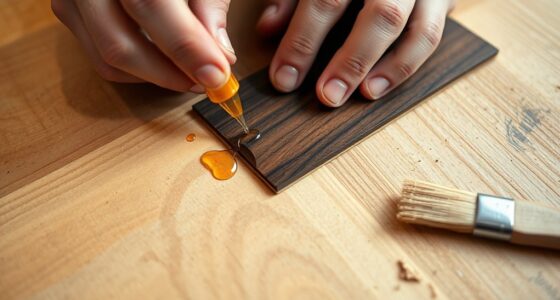
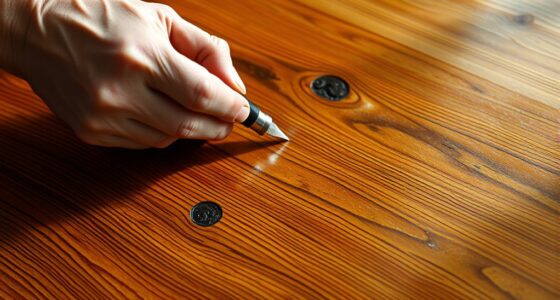
When applying banding, you first need to carefully measure and cut your material to match the existing edge, ensuring a seamless look once adhered. Clean the surface thoroughly to remove dust, grease, or old adhesive residues, as these can weaken the bond. Applying the adhesive evenly on both the banding and the surface is essential—use a brush or roller for a smooth, consistent coat. Once you place the banding or veneer tape onto the edge, press firmly and evenly, making sure to eliminate air bubbles or gaps. Clamping the piece temporarily can help achieve a tight, uniform bond while the adhesive cures. Additionally, proper airflow around the repaired surface can improve curing and adhesion quality.
Veneer tape is another excellent option for minor repairs or aesthetic updates. It’s thin, flexible, and easy to work with, allowing you to cover worn or damaged edges seamlessly. When using veneer tape, make sure to carefully align it with the existing edge before pressing it down. A roller or a flat tool can help ensure good contact and remove any trapped air or excess adhesive. After the adhesive sets, you might need to trim or sand the edges for a perfect finish.
Ultimately, successful edge repair relies on proper adhesive selection and careful application. By paying attention to the type of edge damage and choosing the correct bonding agent, you can restore your surfaces efficiently and extend their lifespan. Whether you opt for banding or veneer tape, these techniques provide a cost-effective, practical way to keep your furniture and fixtures looking their best.

DEWALT Router, Fixed Base, 12-Amp, 24,000 RPM Variable Speed Trigger, 2-1/4HP, Corded (DW618)
2-1/4 HP (maximum motor HP), 12.0 Amp electronic variable speed motor provides the power to rout smoothly through...
As an affiliate, we earn on qualifying purchases.
Frequently Asked Questions
What Tools Are Necessary for Banding and Veneer Tape Edge Repair?
You need a basic tools overview for banding and veneer tape edge repair, including scissors or a utility knife for trimming, a clean cloth for smoothing, and a roller to press the tape firmly. Material selection is key—choose the right veneer tape or edging banding that matches your surface. A heat gun or iron can help secure the adhesive, ensuring a smooth, durable finish.
How Long Does Each Edge Repair Method Typically Last?
Think of your repaired edges like a favorite pair of shoes—well-maintained, they last longer. Banding typically lasts 3-5 years with proper care, while veneer tape can sometimes last 2-4 years, depending on usage. The durability comparison hinges on factors like exposure to moisture and temperature changes. To prolong lifespan, keep repairs clean, avoid excessive moisture, and reapply protective finishes as needed. Regular maintenance ensures your edges stay looking sharp longer.
Can These Techniques Be Used on Curved or Irregular Edges?
Yes, these techniques can be adapted for curved or irregular edges. For curved edge techniques, you’ll want to use flexible banding or veneer tape that conforms smoothly to the shape. Irregular edge solutions often involve trimming or shaping the material before application to guarantee a seamless fit. With the right tools and patience, you can achieve a professional look on any edge, no matter how curved or uneven.
What Are Common Mistakes to Avoid During Edge Repair?
When repairing edges, avoid common mistakes like rushing the process or using the wrong adhesive, which can lead to edge damage or adhesive mishaps. Always guarantee the surface is clean and dry before applying banding or veneer tape. Don’t press too hard, as it can cause warping. Take your time, follow instructions carefully, and test adhesives on scrap material first to prevent costly mistakes.
How Do I Match Veneer Tape Color With Existing Furniture?
To match veneer tape color with existing furniture, start with veneer color matching by comparing samples in natural light. Use edge blending techniques to seamlessly blend the new veneer tape with the old, adjusting the color if needed with stains or dyes. Test your match on a scrap piece first, then carefully apply, ensuring the tone and grain align for a cohesive look.
SKIL 14 Amp Plunge and Fixed Base Router Combo — RT1322-00
14 AMP PLUNGE ROUTER - Powerful 14 Amp, 2.5 HP motor includes both fixed and plunge bases for...
As an affiliate, we earn on qualifying purchases.
Conclusion
Now that you know the banding and veneer tape techniques, you’re well on your way to mastering edge repairs. Think of these methods as your toolbox’s shining gems—ready to save the day whenever a damaged edge appears. With a little patience and practice, you’ll handle repairs smoothly, like a seasoned pro. Remember, every successful fix is a small victory, turning your furniture from worn to wonderful. Keep practicing, and soon, edge repairs will feel like second nature!

O'SKOOL Router Lift Systems for 3-1/2" Diameter Motors, 9-1/4'' x 11-3/4'' Plate 5-Piece Insert Ring Kit, RTS05
This router lift features a 3.5" diameter carriage and is compatible with popular 3-1/2” router models such as...
As an affiliate, we earn on qualifying purchases.

Bench Grinder Belt Sander Combo, 6-Inch Bench Grinder & 2"x27" Belt Sander, 2.5A Induction Motor, Dual Function Sharpening and Sanding Machine for Knives, Wood, and Metal Work
【Dual Grinding & Sanding Combo Tool】 This bench grinder belt sander combo integrates a 6-inch grinder wheel with...
As an affiliate, we earn on qualifying purchases.