To add exotic wood accents to your DIY veneer projects, start by sourcing sustainable, ethically harvested veneers to guarantee environmental responsibility. Carefully select and handle your materials, applying techniques like sanding, dust removal, and thin coats of finish to enhance natural grain and beauty. Use adhesive methods like contact cement or iron-on, and always seal with a protective topcoat. If you want to achieve professional results with eco-friendly touches, keep exploring these steps for stunning, sustainable furniture accents.
Key Takeaways
- Use sustainably sourced, high-quality exotic veneers to ensure eco-friendly and beautiful accents.
- Prepare and finish veneers with proper sanding, dust removal, and protective coatings for a smooth, professional look.
- Apply appropriate adhesives like contact cement or iron-on for secure, bubble-free attachment.
- Trim excess veneer carefully with a sharp blade for clean edges and precise detailing.
- Seal finished projects with a topcoat to enhance durability and showcase the exotic wood’s natural beauty.

Veneer projects are a fantastic way to upgrade your furniture and add a touch of elegance to your home without breaking the bank. When you’re exploring exotic wood accents, it’s essential to start with carefully sourced materials. Sustainable sourcing isn’t just a buzzword; it guarantees that the beautiful woods you choose are harvested responsibly, helping preserve forests and support ethical forestry practices. By selecting veneers from suppliers committed to sustainability, you can enjoy stunning, high-quality wood while minimizing environmental impact. This approach not only makes your project more eco-friendly but also adds value and integrity to your finished piece.
Choosing sustainable veneers ensures eco-friendly, high-quality wood that adds value and integrity to your furniture.
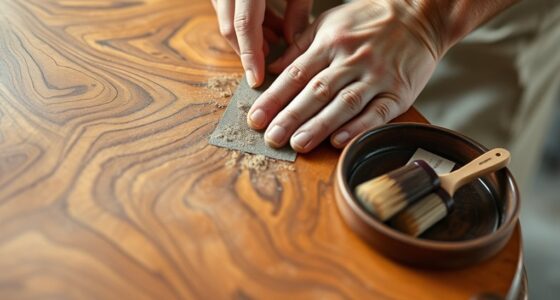
Once you’ve secured your veneer, the finishing techniques you choose will considerably influence the final look. Proper finishing enhances the natural beauty of exotic woods, highlights intricate grain patterns, and protects the veneer surface. Whether you’re applying a clear polyurethane, oil, or lacquer, ensure you follow a systematic process—sanding smoothly, removing dust, and applying thin, even coats. Use a brush, roller, or spray for an even application, and allow each layer to dry thoroughly before adding the next. Sand lightly between coats to achieve a sleek, professional finish. With patience and attention to detail, your veneer project will boast a polished appearance that mimics high-end craftsmanship.
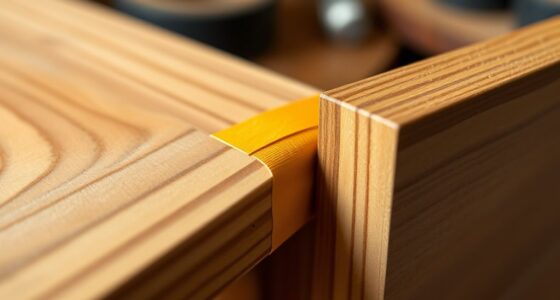
Incorporating exotic wood accents into your furniture doesn’t require expert skills, but understanding a few key techniques can make a big difference. For example, when applying veneer, you may choose to use an iron-on adhesive or a contact cement, depending on your project and the veneer’s thickness. Both options require careful application to prevent bubbling or misalignment. Once adhered, trimming excess veneer with a sharp blade ensures clean edges, creating a seamless look. To improve durability, consider sealing the veneer with a protective topcoat that complements your chosen finish, adding longevity and resistance to everyday wear and tear.
Throughout your project, remember that patience and precision are your best tools. Take your time selecting sustainable, ethically sourced veneers, and follow meticulous finishing techniques. These steps will help you craft beautiful, exotic wood accents that elevate your furniture while respecting the environment. Additionally, understanding preppy dog names can be useful if you’re creating custom accessories or pet furniture, adding a personalized touch to your project. By combining sustainability with skillful finishing, you’ll not only create stunning pieces but also enjoy the satisfaction of doing something meaningful for both your home and the planet. Your efforts will shine through in the craftsmanship, making your DIY veneer project a true statement of style and responsibility.

Sauers – SCV-20-MXDOM&EXOTIC Veneer Variety Pack 20 Sq. Ft. by
Sheet Size: 5.5" – 7.5" x 12"
As an affiliate, we earn on qualifying purchases.
As an affiliate, we earn on qualifying purchases.
Frequently Asked Questions
How Do I Choose the Right Exotic Wood Veneer for My Project?
To select the right exotic wood veneer, consider the wood grain patterns to match your project’s style and flow. Think about color matching to guarantee the veneer complements your existing materials or desired aesthetic. You should also think about the durability and finish of the wood, as well as how the grain direction will enhance the overall look. Take your time to compare samples and visualize how each option will fit your project.
What Tools Are Essential for Applying Veneer Accurately?
You need essential tools like a veneer roller or J-roller to apply veneer accurately, ensuring a smooth, bubble-free finish. Use a fine-tooth saw or utility knife to cut veneer to the correct size, paying attention to veneer thickness for easier handling. For adhesive techniques, a high-quality contact cement or veneer glue works best, and a brush or roller helps spread it evenly. These tools help achieve precise, professional results in your project.
How Can I Prevent Veneer From Warping or Bubbling?
To prevent veneer from warping or bubbling, you should start by applying edge sealing to protect the edges from moisture. Use proper clamping techniques to guarantee even pressure and avoid air pockets. Make sure your workspace is flat and stable, and work quickly to adhere the veneer smoothly. Regularly check your progress, and remove excess glue promptly, which helps maintain a flawless, bubble-free finish.
What Are the Best Finishes to Protect Exotic Veneer Surfaces?
Protecting exotic veneer surfaces is like shielding a delicate jewel, and the best finishes are clear polyurethane or lacquer, which enhance the wood grain patterns while providing a durable barrier. Opt for finishes designed specifically for veneer, considering the veneer thickness to avoid uneven coating. Applying multiple thin coats guarantees protection without compromising the intricate grain details, keeping your project stunning and long-lasting.
How Do I Repair Damaged Veneer Sections Effectively?
To repair damaged veneer sections, start with veneer restoration by carefully removing any loose or chipped veneer. Clean the area and apply a suitable veneer adhesive, ensuring good surface adhesion. Use a veneer patch or thin matching veneer piece, pressing it firmly into place. Sand lightly once dry to blend seamlessly, then finish with a protective coating. This method restores the surface and maintains strong surface adhesion for a durable repair.

Howard Products RF4016 RF3016 Restor-A-Finish, 16 oz, Walnut, 16 Fl Oz
Restor-A-Finish is a unique finish-penetrating formula that restores wood finishes while blending out minor scratches, blemishes and abrasions
As an affiliate, we earn on qualifying purchases.
As an affiliate, we earn on qualifying purchases.
Conclusion
Now that you’ve explored these DIY veneer projects, you’re ready to add stunning exotic wood accents to your home. Remember, Rome wasn’t built in a day—patience and practice will turn your ideas into beautiful realities. With a little effort, you can transform ordinary pieces into extraordinary works of art. So go ahead, get creative, and let your unique style shine through. After all, the best way to learn is by doing!

DAP 272 Dap 00 Weldwood The Original Contact Cement, Tan
Tips for a good project:
As an affiliate, we earn on qualifying purchases.
As an affiliate, we earn on qualifying purchases.

Romeda 8-Pack Sanding Sponge, Four Grits Per Pack 60/80/120/220, Washable and Reusable Handmade Sandpaper Block, Drywall Sandpaper Blocks for Wooden Drywall Sheetrock and Metal Glazing
【ASSORTED GRIT SANDING BLOCKS】 8 sand blocks, 4 sizes from coarse to ultra-fine sand, 60/80/120/220 grit, 2 blocks…
As an affiliate, we earn on qualifying purchases.
As an affiliate, we earn on qualifying purchases.