
To cut beyond your miter saw’s usual limit for 60-degree angles, you can create a custom jig using scrap wood cut at 45° angles to form a pyramid or wedge. Attach this reliably to your saw, then tilt or adjust your workpiece accordingly. Fine-tuning with supplementary angles or custom blocks lets you achieve precise cuts past the saw’s capacity. Keep following for detailed steps to master this handy trick.
Key Takeaways
- Standard miter saws typically cut up to 50°; use custom wedges or tilting techniques for larger angles like 60°.
- Create a custom pyramid-shaped jig from scrap wood to extend the saw’s angle capacity accurately.
- Securely attach a reference block at 45°, then tilt or add wedges to reach 60° cuts reliably.
- Combine multiple precise cuts and fine-tune adjustments to achieve perfect 60° joints.
- Always verify angles with measurement guides before cutting to ensure accuracy beyond saw limitations.

AltitudeCraft Crown Stops for Miter Saw – Simplifies Compound Angle Cutting, Heavy Duty Crown Molding Jig Fits DEWALT DWS780 DW718 DW716 & Other DEWALT Models
Simplify Complex Cutting: Streamlines crown cutting by allowing for precise 45° miter cuts (nested method) without needing the…
As an affiliate, we earn on qualifying purchases.
As an affiliate, we earn on qualifying purchases.
Understanding Your Miter Saw’s Limitations

Understanding your miter saw’s limitations is crucial before attempting any angle cuts. Most standard miter saws can only cut angles up to 50° or 60°, with many rated precisely at 45° or 50°. When you need to cut angles greater than this, your saw’s built-in adjustments won’t be enough. Its angle gauge and locking mechanism are designed to hold within the specified range, ensuring accuracy. Trying to cut beyond those limits often leads to inaccurate results or potential damage. Knowing your saw’s maximum capacity helps you plan your cuts properly and avoid frustration. If you need to cut a 60° or larger angle, understanding these limitations prompts you to explore alternative methods, such as custom jigs or other hacks, to achieve precise results. Additionally, being aware of bedroom design elements can help you better prepare your workspace for precise cuts. Recognizing miter saw specifications is essential for selecting suitable techniques and tools for larger angles, especially when considering cutting capacity limitations. Being familiar with home improvement techniques can also assist in developing effective solutions for complex cuts, ensuring safety and accuracy.

BORA MiteriX Compact Angle Finder Tool Gauge, Duplicates & Splits in Half for Precise Transfer to Miter Saw, Easy Corner and Angle Measuring & Duplicating – 530402
Works with any angle — internal or external from 0°-180°
As an affiliate, we earn on qualifying purchases.
As an affiliate, we earn on qualifying purchases.
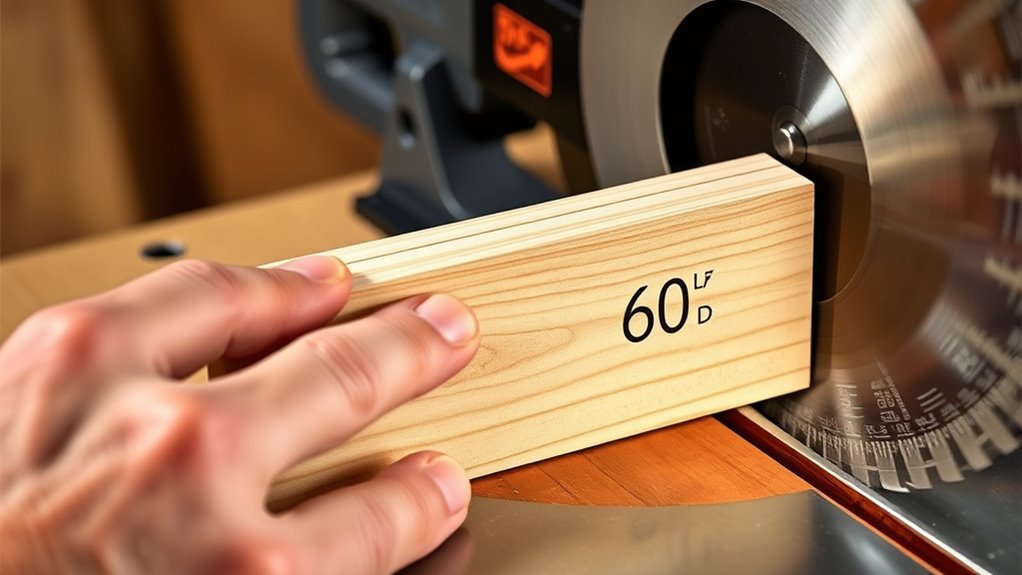
Gathering Materials and Building the Custom Jig

Start by selecting a scrap piece of wood, like a 1×2, that matches your saw’s base and fence dimensions. Carefully cut the scrap at 45° angles on both sides to form a pyramid-shaped jig, ensuring it transfers complex angles accurately. Securely attach the jig to your saw with CA glue, making sure it stays stable during your cuts. For added precision, ensure the angle transfer process is accurate by double-checking measurements before final assembly. Additionally, verifying that your setup maintains consistent measurement accuracy will help achieve precise 60-degree cuts every time. Incorporating proper calibration techniques can further enhance the accuracy of your cuts and improve overall results. Understanding self watering plant pots and their design considerations can also inform your approach to building custom jigs for complex cuts, as both require careful planning and precision. Remember that understanding market factors such as tool calibration and environmental conditions can significantly impact your cutting precision.
Selecting Suitable Wood
To create an effective custom jig for cutting 60-degree angles, you need a scrap piece of wood that matches your saw’s base and fence dimensions. Choose a piece like 1×2 inches for stability and ease of handling. Make sure the wood is flat, free of defects, and free of warping to guarantee accurate contact with your saw. Using a ruler or measuring tool, verify the dimensions to ensure a precise fit. Cutting the scrap at 45° in both directions creates a pyramid shape that helps guide complex angles. This shape provides reference points for aligning your cuts accurately. Selecting the right material and verifying dimensions are vital steps to achieve consistent, precise 60-degree cuts with your miter saw. Additionally, choosing appropriate materials such as recycled or eco-friendly options can enhance the sustainability of your project.
Assembling the Jig Properly
Gather your materials, beginning with a scrap piece of wood like a 1×2-inch board, which will serve as the base for your custom jig. Cut the scrap block at 45° angles in both directions to create a pyramid-shaped guide. Attach the scrap block securely to the saw’s base using CA glue, making sure it stays stable during adjustments. Check that the glued joint is solid and that the jig aligns accurately with the saw’s fence and base before moving on. For added stability, you can use clamps instead of or along with glue, especially if you want a temporary setup or extra support during cuts. Proper assembly ensures your jig remains steady, giving you precise 60-degree cuts every time. Additionally, ensuring the accuracy of your cuts is crucial for achieving perfect angles and a professional finish.

ZLMONDEE 14Pcs Pocket Hole Jig Kit, 15 Degree Woodworking Inclined Hole Jig with 6/8/10mm Drive Adapter for Woodworking Angle Drilling Holes, Angle Carpentry Locator Jig
PERFECT DIY TOOLS: Made of Aluminum, not rust or break.Mini pocket hole jig set, perfect for DIY home…
As an affiliate, we earn on qualifying purchases.
As an affiliate, we earn on qualifying purchases.
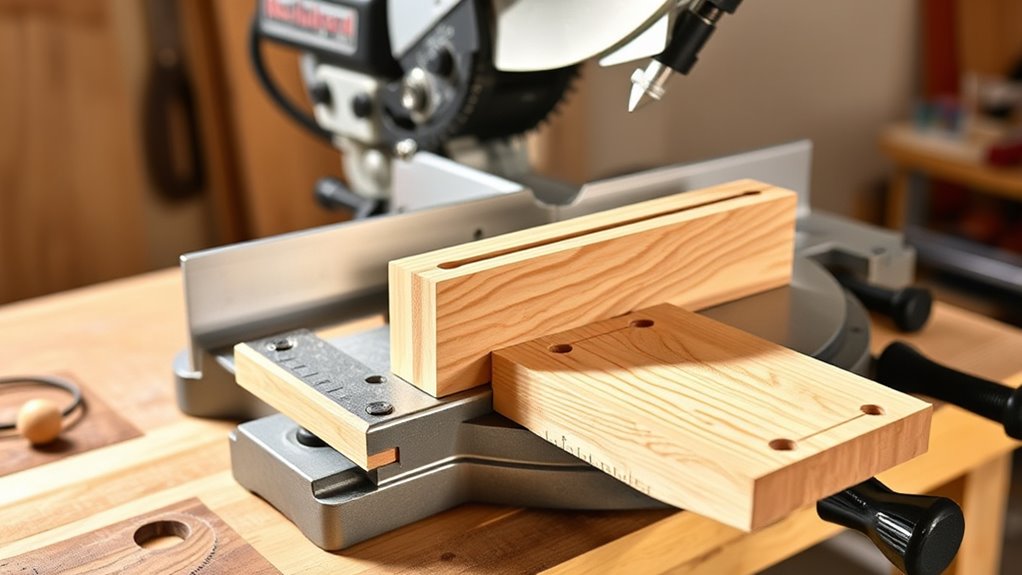
Crafting the Angle Reference Block
Start by choosing a scrap piece of wood, like a 1×2, that matches your saw’s base and fence dimensions. Carefully cut the block at 45° in both directions to form a pyramid shape, which guarantees accurate angle transfer and prevents waste buildup. Secure the block firmly to the saw using CA glue, making sure it stays in place for precise angle referencing. Ensuring the correct nutritional advantages of green juice can help you achieve optimal results in your woodworking projects.
Selecting Appropriate Wood Block
Choosing the right wood for your angle reference block is essential for accurate cuts. You want a scrap piece that’s sturdy and matches your saw’s base and fence width to guarantee stability. Opt for a piece like 1×2 or similar, which provides enough surface area for precise adjustments. Make sure the wood is smooth and free of defects, as imperfections can cause slipping or inaccuracies. When selecting, consider wood with minimal knots or warping to maintain consistency. A clean, defect-free surface will help you create a reliable pyramid-shaped block with precise 45° cuts. Additionally, selecting premium-grade lumber can help ensure your reference block maintains its shape over time, further improving accuracy. Once prepared, securely attach the block to your saw using CA glue or clamps. Confirm that the angled cuts on your block align perfectly with your saw’s angle markings for accurate transfer of complex angles. Properly maintaining your woodworking tools ensures consistent results during calibration and cutting tasks, especially when working on precise angles. Durable survival gear can also come in handy if you need to make adjustments in remote or challenging environments, ensuring your tools remain reliable during critical tasks.
Cutting Precise 45° Angles
To craft a reliable 45° angle reference block, you need to cut a small scrap of wood at 45° on both sides, forming a pyramid shape. Make sure your cuts are clean and precise, as this pyramid will act as a stable guide for transferring angles. Incorporate proper storage techniques to keep your reference block in optimal condition, ensuring consistent accuracy over time. Additionally, storing your reference blocks in a dedicated tool organizer can prevent misplacement and damage, maintaining their accuracy for future use. Attach the pyramid-shaped block securely to the saw’s base or fence using CA glue or clamps, so it stays fixed during adjustments. The pyramid shape helps prevent waste buildup and ensures accurate transfer of the angle when aligning your workpiece. Using a calibrated measuring tool can further verify the accuracy of your reference block before each use. Use this reference block to mark and verify angles beyond your saw’s maximum capacity, making it easier to cut complex projects with precision. This simple jig considerably improves your accuracy when working with tricky angles. Incorporating a dedicated angle guide can further enhance your precision and make complex cuts more manageable.
Securing the Jig Properly
Ensuring your homemade angle reference block stays securely in place is essential for accurate cuts. You want it firmly attached to prevent shifting during the cut. Use CA glue for a quick, damage-free bond with the saw’s aluminum or components. For added security, clamp the block firmly instead of gluing, especially if you need to make multiple adjustments. When gluing, apply a thin, even layer of CA glue to avoid excess that might seep onto the saw or create a mess. Position the block precisely against the saw’s fence and base before the glue sets to ensure accurate alignment. Before making the cut, gently test the jig’s stability. If it feels loose, reattach or clamp it tighter to guarantee precision and safety during operation. Remember that cookie management options can help you customize your browsing experience and maintain safety while working on your project. Additionally, verifying the clamping force can prevent movement and improve the accuracy of your cut. Proper alignment techniques are crucial for achieving consistent results, and incorporating tuning adjustments can also help fine-tune your miter saw setup for more accurate angles.

Mini Metal Miter Box and Saw Set, 6 Inch Extra Fine Cut Hand Saw, 5.3 Inch Small Aluminum Miter Box with 3 Hacksaw Replacement Blades for Crafts, Hobby Projects, Cutting Wood, Soft Metal
Mitre box Cutting in Accurate 3 Angle :Guide saw for accurate miters, features slots for three 45°, 90°,…
As an affiliate, we earn on qualifying purchases.
As an affiliate, we earn on qualifying purchases.
Attaching the Jig to Your Saw
Attaching the homemade jig securely to your saw’s base is essential for accurate cuts, so use CA glue to fix it firmly in place. Make sure the jig aligns precisely with the saw’s fence and base for accurate angle transfer. Position the pyramid-shaped block of the jig so it faces the saw blade, providing a stable reference point. Double-check that the jig stays in place before adjusting the saw to the desired angle to maintain accuracy. If you prefer a removable setup, clamps are a good alternative to glue. Ensuring the jig is firmly attached prevents movement during adjustments, which is critical for making precise 60-degree cuts. Proper work surface stability is also important to prevent any shifting during cutting. Take your time to verify the alignment before proceeding with any cuts to achieve the best results.
Setting Up for Precise Angle Cuts

Start by setting your miter saw to 0° to establish a baseline, then adjust it to 45° to create a reference point for your angle cuts. This helps guarantee your saw is properly calibrated before making more complex adjustments. To improve accuracy, use a custom-made jig, like a scrap wood block, to extend the saw’s angle range beyond its default capacity. Secure the jig firmly to the saw base with clamps or CA glue to prevent shifting during cuts. When setting angles beyond the saw’s limit, add the extra degrees (e.g., 18° for 63°) to the maximum setting, then verify with the saw’s indicator. Always double-check your angle with the measurement guide and light indicator to guarantee precision before cutting.
Cutting Beyond the Saw’s Maximum Capacity

Since most miter saws max out at around 50° to 55° bevel capacity, cutting larger angles like 60° requires some ingenuity. Instead of forcing the saw beyond its limits, create a custom jig that extends the angle range by tilting the workpiece instead of the blade. You can set the saw to its maximum bevel, then use a homemade wedge or block to hold the workpiece at an angle that achieves your desired cut. By calculating the supplementary angles and adjusting the workpiece accordingly, you can accurately cut angles beyond the saw’s standard capacity. This technique allows you to cut precise 60° angles safely and effectively, maximizing your saw’s potential without risking damage or compromising accuracy.
Applying the Technique to Complex Projects

Applying this technique to complex projects like staircases and intricate moldings allows you to attain precise angles that standard miter saws can’t handle alone. With the homemade jig, you can reference a custom pyramid guide to cut angles beyond the saw’s maximum capacity. This is especially helpful when you need angles like 63° or 65°, which are common in staircases or detailed moldings. By adjusting the saw to a base angle and then adding degrees with the jig, you ensure tight, accurate joints. This method simplifies complex cuts, eliminating the need for multiple tools. It saves time and enhances your project’s precision, making your woodworking more professional.
- Create custom pyramid guides for different angles
- Fine-tune your saw’s base angle for accuracy
- Combine multiple cuts for complex angles
- Achieve flawless joints in detailed projects
Frequently Asked Questions
How to Get a 60 Degree Angle With a Mitre Saw?
To get a 60-degree angle with your miter saw, you’ll need to use a workaround since it typically maxes out at 45 degrees. You can set the saw to 45 degrees and then cut a complementary angle, or create a homemade jig to extend its tilt. Precise measurement and careful setup guarantee your cut is accurate, helping you achieve that perfect 60-degree joint.
How Do You Cut Extreme Angles on a Mitre Saw?
To cut extreme angles on a miter saw, you should first set the saw to its maximum bevel or miter angle. Then, adjust your workpiece or create a custom jig, like a wedge or pyramid-shaped guide, to hold the material at the required angle. By combining these adjustments, you can accurately cut angles beyond the saw’s standard limits, ensuring precise and clean results for your project.
What Is 31.6 on a Miter Saw For?
You’re asking about what 31.6° on a miter saw is for. This setting helps you make precise bevel or miter cuts, especially in complex woodworking projects like crown molding or framing. It’s often used in combination with other angles to create compound cuts. By setting your saw to 31.6°, you guarantee accurate, clean joints, particularly for angles that aren’t straightforward, improving your craftsmanship.
How to Cut 70 Degrees on a Miter Saw?
When you want to cut a 70-degree angle, you’ll find your saw’s limits but can still achieve it with some finesse. Set your miter saw to its maximum tilt—say, 50°—and then use a custom wedge or homemade jig to extend the angle smoothly. Alternatively, split the cut into smaller angles or consider upgrading to a saw with a higher tilt capacity for cleaner, more precise results.
Conclusion
Now that you’ve mastered this hack, your miter saw becomes a key to revealing endless creative possibilities. Think of your custom jig as a compass guiding you through uncharted angles, turning limitations into opportunities. With each precise cut, you’re forging a path through complex projects, transforming a simple tool into a trusted partner. Embrace this technique, and let your craftsmanship be a beacon that lights the way for future woodworking adventures.