
When repairing a broken tenon, select a dowel slightly larger than the broken section and apply glue into the cleaned mortise or hole. Carefully insert the dowel, twisting gently to spread the glue, then clamp it firmly until it sets. Once dry, trim the dowel flush and sand smoothly. Proper dowel size, clean surfaces, and patience guarantee a strong, seamless fix. Keep exploring to learn more tips for a durable repair.
Key Takeaways
- Select a dowel slightly larger than the broken tenon for a tight, secure fit.
- Clean debris and old glue from the broken joint before applying new glue.
- Apply an even coat of wood glue inside the broken tenon or hole for strong adhesion.
- Insert the dowel carefully, twisting slightly to spread the glue evenly, then clamp until dry.
- Trim the dowel flush and sand smoothly to restore the original finish and joint strength.
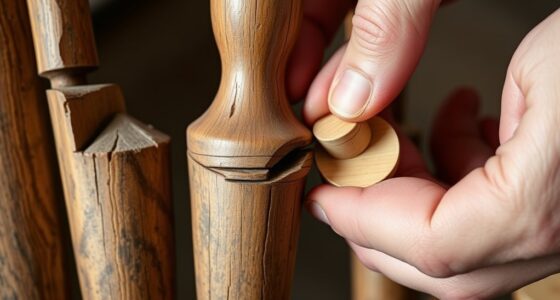
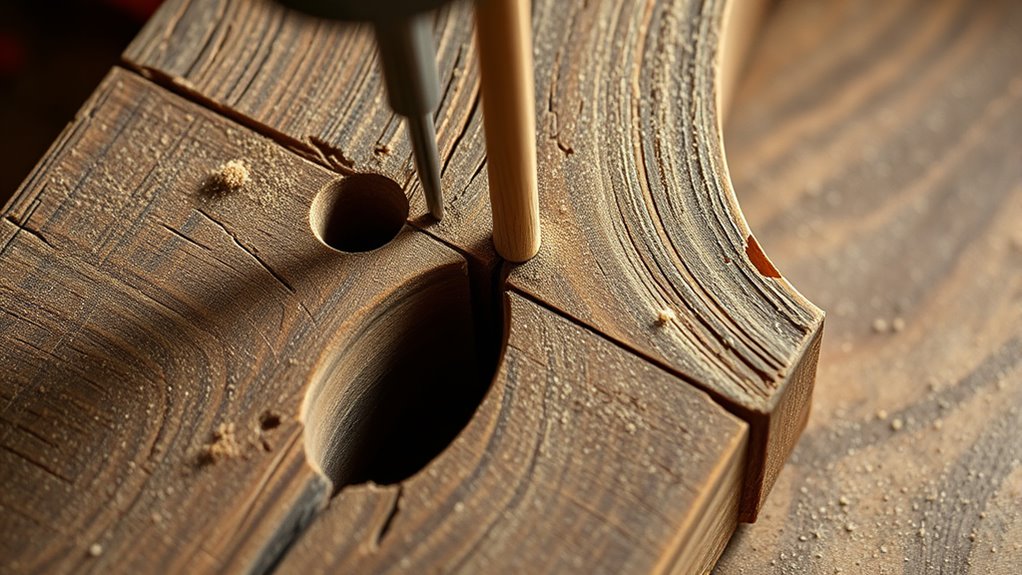
When a tenon breaks, it can compromise the strength and stability of your woodworking project. Luckily, you can often repair it without starting over, especially with the dowel‑insert rescue technique. This method involves inserting a wooden dowel into the broken tenon to restore its integrity. To do this effectively, you need to focus on proper dowel selection and glue application, key steps that determine the repair’s success.
Start by choosing the right dowel. Consider the size and wood species to match your project. The dowel should be slightly larger than the broken tenon’s diameter to ensure a tight fit. You want a dowel that’s sturdy enough to handle stress but not so thick that it forces you to reshape the mortise or tenon excessively. When selecting the dowel, check for straightness and minimal knots, as these can weaken the repair. Cutting the dowel slightly longer than the broken section allows for a secure fit, and you can trim it flush later. The right dowel sets the foundation for a strong repair, so don’t rush this step.
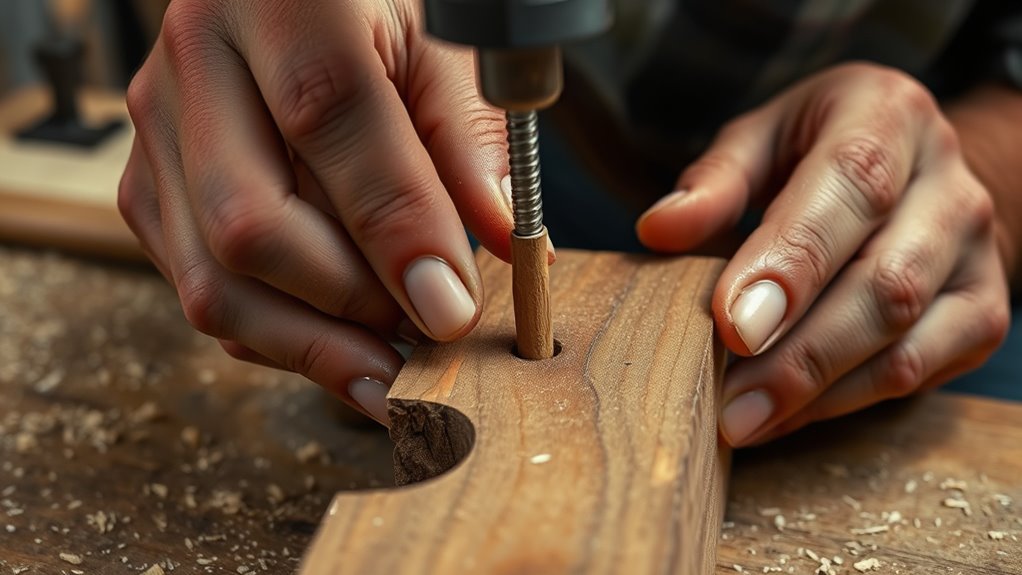
Next, focus on glue application. Proper glue use is essential for bonding the dowel securely inside the mortise or hole. Before applying glue, clean any debris or old glue from the broken area to ensure a clean surface. Apply an even coat of wood glue to the inside of the broken tenon or the hole where the dowel will go. Be generous but avoid excess, which can cause mess and weaken the joint. Insert the dowel carefully, twisting slightly to spread the glue evenly and seat it fully into place. Use clamps or steady pressure to hold the assembly while the glue dries, following the manufacturer’s recommended drying time.
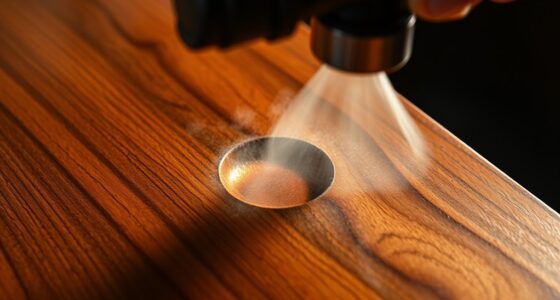
Once the glue has set, you can trim the dowel flush with the surrounding wood surface using a fine saw or chisel. Sand the area smooth to match the original finish. This repair method, when done correctly, restores the joint’s strength and keeps your project intact. Remember, the key is in careful dowel selection and precise glue application. Properly executed, this technique can save your project from complete disassembly and give new life to a broken tenon. With patience and attention to detail, you’ll be able to reinforce your work and enjoy a durable, stable piece once more. Additionally, understanding the role of proper drying time ensures the glue cures fully for maximum strength.

240Pcs Wood Dowels Kit 1/4 3/8 5/16 Inch Dowel Rods Pins with Tapered End with Bevel Angle Groove Wood Pegs for Repair Replacement Furniture Woodworking DIY Crafts
Wooden Dowel Pins Set: Includes 1/4 x 1-3/16Inch & 1/4 x 1-1/2Inch & 5/16 x 1-3/16Inch & 5/16…
As an affiliate, we earn on qualifying purchases.
As an affiliate, we earn on qualifying purchases.
Frequently Asked Questions
Can This Technique Be Used on Metal Tenons?
You might wonder if this technique works on metal tenons. Generally, it’s designed for wood, so metal repair and tenon compatibility can be challenging. Metal tends to require different bonding methods, like welding or metal epoxy. While the dowel-insert rescue technique is effective for wooden tenons, it’s not suitable for metal ones because the materials and bonding needs differ markedly. Always choose a method tailored to the specific material for the best results.
What Types of Wood Are Suitable for This Repair?
Imagine restoring a piece of furniture and wondering if your wood is compatible. Not all woods are suitable for this repair—hardwoods like oak, maple, and cherry usually work best due to their strength. Softwoods such as pine may pose repair limitations because they don’t hold the dowel securely. Be cautious; understanding wood compatibility guarantees your repair lasts, avoiding future problems. Choose wisely to achieve a durable, seamless fix.
How Long Does the Repair Process Typically Take?
The repair process usually takes a few hours, but timing considerations are essential. You’ll need to allow for the curing duration of the glue or epoxy, which can range from 30 minutes to several hours depending on the product. Plan ahead and avoid handling the piece too early. Patience guarantees a strong, durable repair, so follow the manufacturer’s instructions carefully for ideal results and to prevent any setbacks.
Is Special Equipment Required for the Dowel‑Insert Rescue?
Oh, sure, you’ll need a full arsenal of special equipment, right? Nope. For the dowel‑insert rescue, you mainly rely on standard woodworking tools—drill, clamps, saw, and maybe a chisel. No fancy gadgets required. It’s a straightforward process that doesn’t demand anything beyond your usual toolkit. So, don’t worry about hunting down rare equipment—your everyday woodworking tools will do just fine.
Can This Method Be Used for Structural Load-Bearing Joints?
You can use the dowel-insert rescue technique for load-bearing repairs, but it’s essential to assess the joint’s structural integrity first. This method provides a strong, durable fix when done correctly, making it suitable for some load-bearing applications. However, for critical structural joints, consulting a professional is wise. Properly executed, this technique helps restore strength and stability without compromising safety.

Titebond Original Wood Glue 5063, Industry Standard for Woodworking, Furniture Repair/Assembly, Construction, Home Repair or Modeling, 8 oz
This item is a Franklin International 5063 Titebond Original Wood Glue, 8-Ounce
As an affiliate, we earn on qualifying purchases.
As an affiliate, we earn on qualifying purchases.
Conclusion
Now, instead of discarding a damaged tenon, you can breathe new life into it with the dowel-insert rescue technique. It’s like giving your woodworking a second chance—turning a broken moment into a lasting solution. Just as a shattered piece can become whole again, your project can stand strong once more. Embrace this repair method, and watch your craftsmanship transform setbacks into opportunities for ingenuity and resilience.

4 Inch Bar Clamps for Woodworking, 5 Pcs Trigger Quick Grip Clamps, One Handed Ratchet Wood Working Clamp, Mini Small Bar Woodworking Clamps for Wood Gluing Crafts (4Inch)
Superb Material: The durable material provides a construction that won’t buckle or bend under pressure and repeated use,…
As an affiliate, we earn on qualifying purchases.
As an affiliate, we earn on qualifying purchases.

RUITOOL Japanese Hand Saw 6 Inch Double Edge Sided Pull Saw Ryoba SK5 Flexible Blade 14/17 TPI Flush Cut Beech Handle Wood Saw for Woodworking Tools
An Idea Gift for Woodworker, Carpenter and Craft Man
As an affiliate, we earn on qualifying purchases.
As an affiliate, we earn on qualifying purchases.