
To cut accurate miter joints, use a miter saw and double-check your angles before making each cut, ensuring they fit perfectly together at around 45 degrees. Clamping your pieces securely helps prevent slips and gaps. Adding splines into cross-cut slots enhances the joint’s strength and appearance, hiding imperfections and giving a decorative touch. If you want to achieve professional results, keep exploring how precise cuts and splines can transform your projects.
Key Takeaways
- Use a miter saw to ensure precise 45-degree cuts for seamless corner joints.
- Measure and mark carefully before cutting to achieve accurate angles and prevent gaps.
- Calibrate your saw regularly for consistent, clean cuts essential for tight joints.
- Insert splines into cross-cut slots to reinforce the miter joint and improve stability.
- Finish and sand joints smoothly, aligning splines properly for a polished, professional appearance.

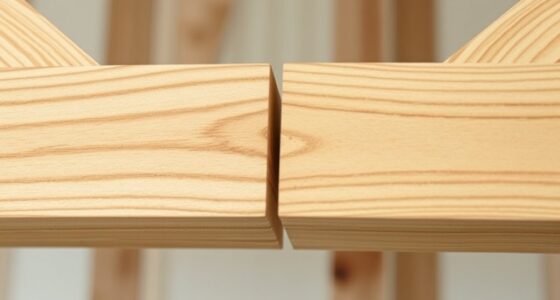
A miter joint is a popular woodworking technique used to join two pieces of material, usually at a 45-degree angle, to create a clean, seamless corner. This method is widely appreciated for its ability to produce sharp, precise corners that look polished and professional. When you’re working with joinery techniques, mastering the miter joint allows you to craft frames, boxes, and furniture with a refined aesthetic. Its simplicity and effectiveness make it a go-to choice for many projects where both strength and appearance matter.
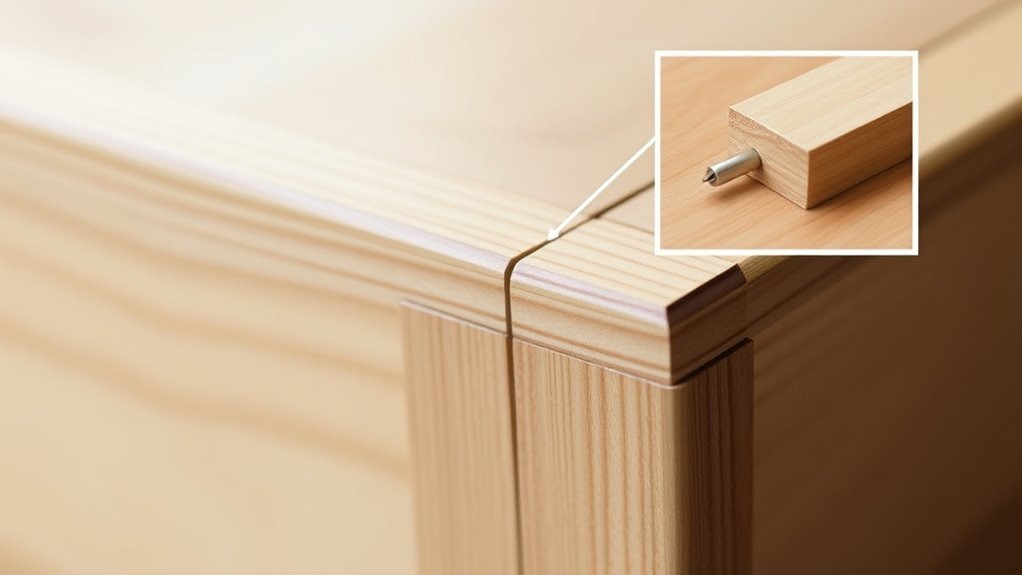
To achieve a perfect miter joint, you need to cut the edges of your pieces at exact angles. A miter saw is your best tool here, providing the accuracy needed to produce clean cuts. Precision is critical because even slight deviations can result in gaps, ruining the joint’s appearance. Once the pieces are cut, you can join them with glue, nails, or clamps, ensuring tight contact along the mitered edges. For added strength and stability, some woodworkers incorporate splines—thin strips of wood inserted into slots cut across the joint. This technique not only enhances the joint’s durability but also adds a decorative element that can elevate the visual appeal of your project.
Cut precise angles with a miter saw for perfect joints and enhanced project durability.
Incorporating splines into miter joints serves a dual purpose. Besides reinforcing the joint, splines offer an opportunity to add decorative details. You can choose contrasting woods or carve intricate shapes into the spline to create a distinctive look. This enhances the overall design, making your work stand out with subtle yet eye-catching accents. Using splines also helps hide imperfections in your cuts, giving you a cleaner finish. When you add splines, you effectively turn a simple joint into a feature that draws attention and adds character to your piece.
As you develop your skills with miter joints, you’ll find that proper alignment and finishing are key. Sanding the joint smooth and applying a finish that highlights the wood grain can make even a basic miter look sophisticated. Whether you’re building picture frames, cabinet corners, or decorative boxes, paying attention to these details will elevate your craftsmanship. The use of precision tools and careful measurement ensures consistent results. The combination of accurate joinery techniques and creative decorative details like splines allows you to produce furniture and projects that are both functional and aesthetically pleasing. With patience and practice, you’ll be able to create miter joints that are not only strong but also visually impressive.

Metabo HPT 10-Inch Single Bevel Compound Miter Saw, 15-Amp Power Saw with Xact Cut Shadow Line, Precision Miter Angles, Single Bevel 0-45°, 40T TCT Miter Saw Blade, Lightweight Design, C10FCG2
POWERFUL AND PRECISE: This 10-inch single bevel compound miter saw features a 15-Amp motor delivering high power for...
As an affiliate, we earn on qualifying purchases.
Frequently Asked Questions
What Is the History Behind Miter Joints?
You might find it interesting that the joint history traces back thousands of years, with ancient Egypt and China using miter joints in woodworking and carpentry. As woodworking evolved, craftsmen refined the technique for better precision and durability, especially in fine cabinetry and framing. Today, miter joints remain essential in woodworking evolution, showcasing how early artisans mastered angle cuts to create seamless, strong corners in furniture and architectural details.
How Do Miter Joints Compare to Other Corner Joints?
You find that miter joints excel in aesthetic appeal because they create seamless, clean corners, unlike butt or dovetail joints. However, compared to other corner joints, miter joints often have less joint strength unless reinforced with splines or glue. They’re ideal for decorative projects where appearance matters most, but for heavy-duty applications, you might prefer dovetails or box joints for better durability and strength.
Can Miter Joints Be Used for Load-Bearing Structures?
Miter joints aren’t ideal for load-bearing structures since they’re mainly used for decorative applications and furniture design. You can rely on them for aesthetic corners, but they lack the strength needed for structural support. If you want durable, load-bearing joints, consider using dado joints or dovetails instead. For decorative projects, miter joints give a clean, professional look, making them perfect for frames, boxes, and furniture accents.
What Safety Precautions Should Be Taken When Cutting Miter Joints?
Think of cutting miter joints like handling delicate glass—you must stay alert. Always wear safety gear like goggles and ear protection, and make certain your saw has safety features engaged. Keep your hands clear of the blade and handle the material with proper handling techniques. I once saw a friend avoid injury by checking his saw’s safety switch before start, reminding you to stay cautious and attentive during every cut.
Are There Specialized Tools for Making Perfect Miter Joints?
Yes, there are specialized tools for making perfect miter joints. You should use a miter saw combined with quality angle guides to guarantee precise cuts. A miter saw allows you to set exact angles, while angle guides help you maintain consistency. Using these tools together, you can achieve clean, accurate miter joints every time, saving you time and effort while ensuring professional results in your woodworking projects.

SKIL 10" Dual Bevel Sliding Compound Miter Saw-MS6305-00
POWERFUL 15 AMP MOTOR - Delivers 4,800 RPM for quick, detailed cuts
As an affiliate, we earn on qualifying purchases.
Conclusion
Mastering miter joints is like opening a secret door to perfect corners. When you cut accurate angles and add splines, you’re weaving strength and beauty into your projects. With a little practice, your craftsmanship will stand tall like a well-built bridge, impressing everyone who sees your work. So, keep honing your skills, and soon, your miter joints will be as precise as a finely tuned instrument, turning your woodworking dreams into reality.

DEWALT Miter Saw, 12-inch Double Bevel Sliding Compound Miter Saw with XPS LED Shadow Light System, Includes Blade Wrench, Material Clamp and Dust Bag (DWS780)
Dimensions - 35cm x 45cm x 25cm
As an affiliate, we earn on qualifying purchases.

Hoteche 7-1/4-Inch Miter Saw 7.5A Compound Single Bevel Chop Saw with Laser and Blade for Wood and Metal Working
【Laser-Guided Precision for Flawless Cuts】Achieve razor-sharp accuracy with the built-in laser guide system, perfect for baseboards, crown molding,...
As an affiliate, we earn on qualifying purchases.