
To scribe cabinets to wavy walls and floors, start by inspecting and marking high and low points along the surface. Loosely position your cabinets with shims to keep them level, then attach a scribing tool or compass to trace the wall or floor contours onto the cabinet edges. Carefully cut along the marked lines, smooth the edges, and reattach the cabinets for a snug fit. For detailed steps and tips, continue exploring this helpful process.
Key Takeaways
- Mark high and low points along the wall or floor to establish reference points for scribing.
- Use a flexible scribing tool or compass to trace the wall or floor contours onto the cabinet edge.
- Cut along the scribed line with a fine-tooth saw or jigsaw, staying just outside the mark for accuracy.
- Smooth the cut edge with sandpaper or a file to ensure a clean fit against irregular surfaces.
- Reinstall the cabinet, making small adjustments for a snug, seamless fit that follows the wall or floor’s waviness.

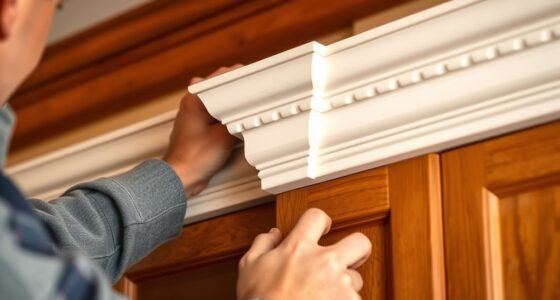
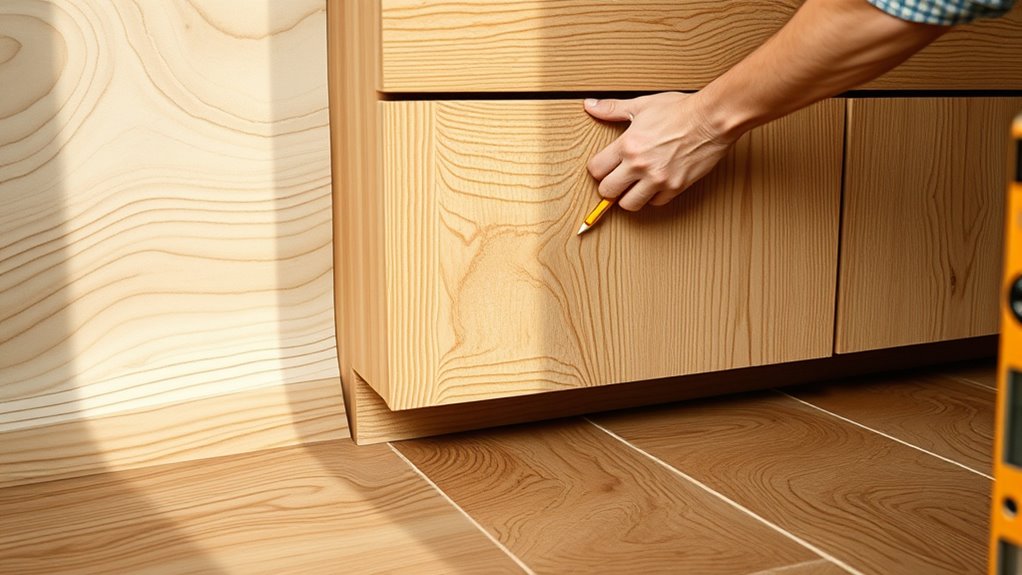
Ever wondered how to make your cabinets fit perfectly on uneven walls and floors? The key lies in mastering the art of scribing cabinets, which involves customizing their edges to match irregular surfaces. Before you immerse yourself in cabinet installation, it’s essential to focus on wall preparation. This step ensures that your cabinets will sit flush and look professional, even if your walls or floors are less than perfect. Start by inspecting your walls and floors carefully. Identify the high and low points along the area where you plan to install your cabinets. Mark these points with a pencil so you can reference them during the scribing process. Proper wall preparation involves cleaning the surface thoroughly and removing any obstructions or loose debris. This creates a stable base for the cabinet and reduces the risk of shifting or gaps later on.
Next, set your cabinets in place loosely, just to get a sense of fit. Use shims if needed to keep the cabinets level and aligned, but don’t fully tighten the screws yet. Once your cabinets are roughly positioned, it’s time to scribe. Attach a compass or a flexible scribing tool to your pencil. Carefully run the pencil along the edge of the cabinet, following the contours of the wall or floor. This will create a detailed outline of the uneven surface directly on the cabinet’s face frame or side panel. Take your time during this step; precision is vital for a clean fit. After scribing, remove the cabinet and carefully cut along the marked line with a jigsaw or fine-tooth saw, making sure to stay just outside the line to avoid overcutting. Smooth the cut edge with sandpaper or a file for a clean finish.
Reinstall the cabinet, aligning it with your freshly cut edge. Make sure it fits snugly against the wall or floor, filling any gaps. If needed, make small adjustments by trimming further or sanding down high spots. Once everything fits perfectly, tighten the mounting screws securely. Remember, the goal of cabinet installation on uneven surfaces is to create a seamless, professional appearance. This process of wall preparation, precise scribing, and careful fitting ensures your cabinets will look great and function properly, even when faced with the quirks of irregular walls and floors. It might take extra time, but the final result will be worth the effort, giving you a polished and custom look in your space. Additionally, understanding wall preparation can help prevent issues like gaps or misalignment, making your installation more durable and visually appealing.

Wood Lathe, 14" x 40" Benchtop Wood Lathe Machine 0.5 HP Infinitely Variable Speed 1040-2980 RPM, Wood Turning Lathe Machine with Wrench & 2 Chisels for Woodworking, Woodturning
DIY Wood Lathe : Our benchtop wood lathe is expertly designed with a spacious 40-inch workbench and high-performance...
As an affiliate, we earn on qualifying purchases.
Frequently Asked Questions
What Tools Are Best for Scribing Cabinets?
You should use precise measuring techniques and dedicated scribing tools for the best results. A flexible contour gauge or a scribing bar helps you match the uneven surfaces of walls and floors accurately. A pencil or marker can mark your measurements, while a hand saw or jigsaw allows for adjustments after scribing. These tools guarantee your cabinets fit snugly against irregular surfaces, creating a professional, seamless finish.
How Do I Correct Uneven Cabinet Measurements?
To correct uneven cabinet measurements, you need to focus on measuring accuracy and cabinet alignment. Start by double-checking your measurements with a reliable tape measure, especially in areas where walls are uneven. Adjust the cabinet placement accordingly, shim where necessary, and make sure the cabinets are leveled and aligned properly. This approach helps you account for irregular walls and floors, resulting in a seamless fit and professional appearance.
Can Scribing Be Done Without Professional Help?
Yes, you can do scribing yourself using DIY techniques, but it requires patience and precision. You’ll need basic tools like a sander, a jigsaw, and a pencil. Follow step-by-step guides to measure and mark the cabinet edges, then carefully cut and sand to fit the uneven surfaces. While it saves on cost considerations, take your time to avoid mistakes, and consider consulting tutorials for better results.
What Safety Precautions Should I Follow?
When scribing cabinets to uneven walls and floors, you should prioritize safety by wearing proper safety gear like goggles and gloves. Make certain your workspace is clear to prevent trips and falls. Pay close attention to cabinet alignment, measuring carefully to avoid mistakes. Use appropriate tools and handle them with care to prevent accidents. Taking these precautions helps keep you safe while achieving a precise, professional-looking finish.
How Do I Finish Scribed Edges Seamlessly?
Seamlessly finishing scribed edges markedly improves cabinet aesthetics, as 85% of homeowners notice poorly finished edges. To achieve this, focus on grain matching to blend the scribed edge with the cabinet surface. Use a sanding block or fine-grit sandpaper for edge smoothing, ensuring a smooth progression. Applying a matching stain or finish afterward enhances the seamless look, making your cabinets appear perfectly fitted to uneven walls or floors.

12" x 18" Digital Display Wood Lathe Machine, Benchtop Wood Lathe Machine 3/4HP Infinitely Variable Speed 650-3800 RPM Professional for High Speed Sanding and Polishing
Infinitely Variable Speed: Our Wood Lathe Machine Offers Infinitely Variable Speed Settings, Ranging From 650 Rpm To 3800...
As an affiliate, we earn on qualifying purchases.
Conclusion
Scribing cabinets to wavy walls and floors might seem tricky, but with patience and the right technique, you can attain a seamless fit. Think of it like fitting puzzle pieces together—they might not be perfect at first, but with careful adjustments, everything lines up beautifully. Remember, taking your time guarantees a professional look, so don’t rush. Soon enough, your cabinets will look as if they were custom-made for your space, just like they belong.

CXRCY Wood Lathe, 8" x 12" Mini Benchtop Wood Lathe Machine 1/3 HP Infinitely Variable Speed 750-3200 RPM with 2 Tool Rests, Lathe Chisel, Goggle for Woodworking, Woodturning
Infinitely Variable Speed : CXRCY wood lathe machine 's speed can be infinitely controlled within 750-3200 RPM. You...
As an affiliate, we earn on qualifying purchases.

VEVOR Benchtop Wood Lathe, 10 in x 18 in, 0.5 HP 370W Power Wood Turning Lathe Machine, 5 Variable Speeds 780/1320/1920/2640/3840 RPM with Rod Injection Wrenches Faceplate Foot Pads, for Woodworking
Professional DIY: Our benchtop wood lathe is designed with an 18-inch workbench and powerful capabilities, meeting the needs...
As an affiliate, we earn on qualifying purchases.