
To flatten boards and create smooth surfaces with hand planing, focus on working with the grain to prevent tear-out and achieve a fine finish. Keep your blade sharp and properly adjusted for thin, controlled shavings. Use shallow passes and smooth, even strokes, adjusting your technique as needed for irregular grain. Mastering these skills results in flat, polished surfaces you’ll be proud of. As you continue, you’ll discover even more ways to refine your craftsmanship.
Key Takeaways
- Always plane with the grain to prevent tear-out and achieve a smooth surface.
- Use shallow passes and consistent pressure for controlled, even planing results.
- Maintain a sharp blade through regular sharpening to ensure clean, effortless cuts.
- Adjust planing angle and technique for irregular or figure-rich grain patterns.
- Regularly check progress and refine technique for flat, smooth, and high-quality board surfaces.

Have you ever wondered how to achieve a smooth, perfectly flat surface on wood without relying on power tools? Hand planing is a traditional skill that, when done correctly, can give you beautifully smooth and flat boards. The key to success lies in understanding the wood’s grain direction and mastering sharpening techniques for your blades. Knowing how to work with the grain ensures that your planing is efficient and leaves a clean surface, while proper sharpening keeps your tools sharp and effective.
Master hand planing by understanding grain direction and sharpening blades for smooth, flat wood surfaces.
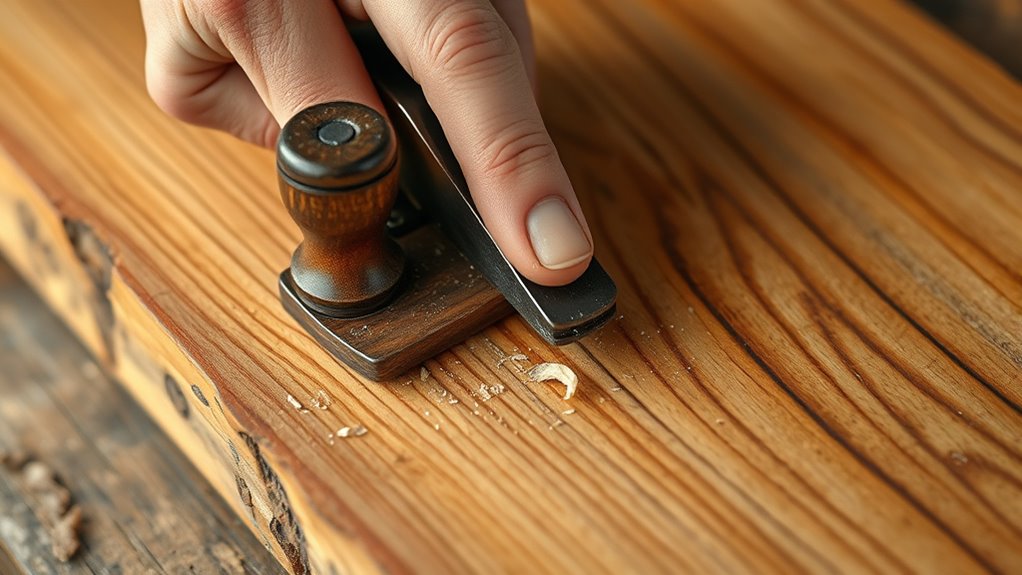
When you start planing, always pay attention to the grain direction. Wood fibers tend to run in a specific pattern, and if you plan against the grain, you risk tearing the fibers, creating rough surfaces or tear-out. To avoid this, examine the board carefully and identify the grain lines. Work with the grain by positioning your plane so that the blade’s cutting edge moves in the same direction as the fibers. This reduces resistance and results in a smoother finish. As you progress, you might need to change your angle slightly to accommodate any grain irregularities, especially on difficult or figure-rich woods. Moving with the grain is essential for achieving that perfectly flat, polished surface.
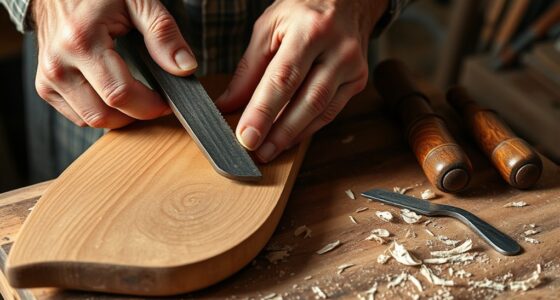
Sharpening techniques are equally important. A dull blade makes planing more difficult and can ruin the surface. Regularly check your blade’s sharpness and use proper sharpening methods to maintain an ultra-sharp edge. Start with coarse grit to reshape the bevel, then move to finer grits for honing the edge. Use a sharpening stone or strop, ensuring you keep the bevel at the correct angle—usually around 25 to 30 degrees. Consistent sharpening not only improves cut quality but also prolongs the life of your blades. When your blade is sharp, you’ll notice the planing becoming easier, and your results will improve considerably.
Additionally, understanding leadership skills such as patience and attention to detail can significantly enhance your craftsmanship, helping you stay focused and methodical throughout the process. As you work on the board, take shallow passes rather than trying to remove a lot of material at once. This gives you more control and helps prevent tear-out. Keep your plane blade properly adjusted, with the cutting edge protruding just enough to shave off thin layers of wood. Use smooth, even strokes, maintaining consistent pressure, and check your progress frequently. If you encounter rough patches, adjust your technique accordingly—sometimes a slight change in angle or a quick touch-up on your sharpening stones can make a big difference.
Ultimately, mastering hand planing involves understanding the grain direction and maintaining sharp blades through proper sharpening techniques. When you combine these skills, you’ll find that achieving a flat, smooth surface on your wood becomes not only easier but also more satisfying. With patience and practice, you’ll develop a keen eye for detail and a craftsmanship that power tools can’t replicate.

JORGENSEN No.101 Mini Wood Planer – Mini Hand Planer for Woodworking, Block Plane, Small Hand Plane for Trimming, Wood Planing, Craft, Professional Ductile Iron Body, Adjustable Cutting Depth
Professional Level Blade: The blade is made of professional level O1 tool steel, improving cutting efficiency while minimizing…
As an affiliate, we earn on qualifying purchases.
As an affiliate, we earn on qualifying purchases.
Frequently Asked Questions
What Safety Gear Should I Wear When Hand Planing?
When hand planing, you should wear protective gloves to guard against splinters and cuts, and a dust mask to prevent inhaling sawdust. Gloves help you maintain a good grip and protect your hands, while a dust mask keeps your lungs safe from airborne particles. Always make sure your safety gear fits well and wear eye protection if there’s a risk of debris. Staying protected allows you to work efficiently and safely.
How Do I Choose the Right Hand Plane for My Project?
Choosing the right hand plane is like picking the perfect tool for a craft. You’ll want to contemplate plane blade selection and the different hand plane types. For rough stock, a larger jack plane works best, while a smooth plane suits finishing touches. Think about the project’s detail and surface needs, and match that with the plane’s size and blade sharpness. Your choice makes all the difference in achieving smooth, flat results.
Can Hand Planing Be Used on Hardwoods and Softwoods Equally?
Yes, hand planing works well on both hardwoods and softwoods. You just need to pay attention to grain compatibility to prevent tear-out, especially in hardwoods. Keep your blade sharp to guarantee smooth cuts and easier planing. Adjust your technique based on the wood type, applying lighter pressure on hardwoods and more control on softer woods. With proper blade maintenance and grain awareness, you’ll achieve excellent results on both types.
How Do I Maintain and Sharpen My Hand Plane?
Imagine your hand plane as a trusty steed. To keep it sharp, regularly check blade alignment and use proper sharpening techniques like honing with a stone. Keep the blade clean and free of rust, and hone it until it’s razor-sharp. Store your plane in a dry place, and occasionally re-align the blade for smooth cuts. This way, your plane stays in top form, ready for any project.
What Common Mistakes Should I Avoid During Hand Planing?
Avoid mistakes like ignoring grain direction, which can cause tear-out, and neglecting proper blade alignment, leading to uneven surfaces. Always check the grain to plan your strokes accordingly, and make sure your blade is sharp and correctly aligned before you start. Rushing or applying excessive pressure also hampers control and finish quality. Taking time to set up your hand plane properly helps you achieve smooth, flat surfaces with less effort.

FIRSTINFO H5401A Replacement Mini Hand Plane Blades Trimming Plane for Woodworking/Trimming/Wood Planing 5 Pcs
💎Replacement Mini Hand Plane Blades for FIRSTINFO Mini Hand Plane
As an affiliate, we earn on qualifying purchases.
As an affiliate, we earn on qualifying purchases.
Conclusion
By mastering hand planing, you turn rough boards into smooth, flat surfaces with your own two hands. It takes patience and practice, but don’t forget, Rome wasn’t built in a day. With consistent effort, you’ll sharpen your skills and produce professional-quality results. Keep at it, and soon you’ll see that persistence pays off, turning a simple tool into a powerful extension of your craftsmanship. Stick with it—success is often just around the corner.

Intelitopia Complete Knife Sharpening Stone Set – Dual Grit Whetstone 400/1000 3000/8000 Knife Sharpener with Leather Strop, Flattening Stone, Bamboo Base, 3 Non-slip Rubber Bases & Angle Guide
【Complete Knife Sharpening Stone Kit】You don't need to be a Pro to sharpen your blades, all you need…
As an affiliate, we earn on qualifying purchases.
As an affiliate, we earn on qualifying purchases.

Beatifoyo 3 Pack Wood Ruler Set – Includes 6 inch (15 mm), 8 inch (20 mm), and 12 inch (30 mm) with SAE & Metric Measurements – for Drawing, Home, Office, and Engineering Use
Made of hard wood, durable and sturdy. Not easy to break and the scale would not fade, allows…
As an affiliate, we earn on qualifying purchases.
As an affiliate, we earn on qualifying purchases.