To turn a wooden mallet from a single log without glue, choose a straight-grained, knot-free piece of hardwood. Carefully carve and shape the head and handle, following the natural grain to prevent splitting. Fit the head snugly onto the handle, adjusting until it’s secure without any adhesives. Patience and precise craftsmanship are key to creating a durable, natural mallet that performs well. Keep going, and you’ll discover more tips on making it last even longer.
Key Takeaways
- Select a straight-grain, knot-free log with proper grain orientation for handle and head.
- Carve the head and handle from the log, following the grain to prevent splitting.
- Shape the head and handle separately, ensuring a snug fit without using glue.
- Use chisels, gouges, and saws aligned with the grain for clean, precise cuts.
- Join the head and handle firmly by fitting and possibly wedging or peening for secure assembly.
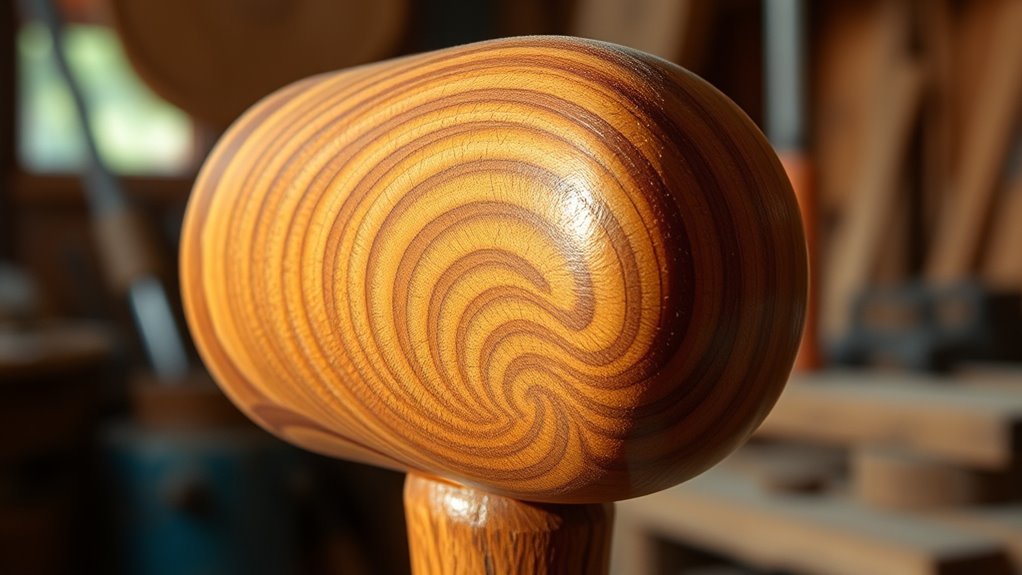
Crafting a wooden mallet from a single log is a rewarding process that combines craftsmanship with natural materials. To start, you need to carefully select the right log, considering its grain orientation. The grain plays a vital role in the mallet’s strength and durability. You want to choose a log where the grain runs lengthwise along the intended handle and head. This alignment ensures the mallet withstands impacts without splitting or cracking. When examining logs, look for straight grain with minimal knots or irregularities, as these flaws can weaken the final piece. Proper grain orientation will allow the wood to flex and absorb shock effectively, making your mallet both sturdy and functional.
Select logs with straight grain and minimal knots for a durable, impact-resistant wooden mallet.
Once you’ve selected the ideal log, tool selection becomes your next priority. For shaping the handle, a combination of saws and chisels works best. A sharp hand saw will help you make clean cuts along the grain, preventing splintering. When carving the handle, use chisels and gouges suited for hardwoods to remove material precisely. For the head of the mallet, you might start with an axe or hatchet, especially if the log is large. These tools enable you to roughly shape the head and remove excess wood quickly. As you refine the shape, switch to files or rasps to smooth edges and achieve the desired contours. Using the right tools not only makes your work easier but also preserves the integrity of the wood, especially when working with tough hardwoods.
Throughout the process, pay close attention to the grain orientation. When carving or shaping, follow the direction of the grain to avoid splintering or tearing the wood. This respect for the natural structure of the material results in a cleaner finish and a stronger final product. If you need to make cuts across the grain, do so carefully, knowing that the wood is more vulnerable to splitting in that direction.
Finally, as you shape the handle and head, test the fit by holding the pieces together and adjusting as needed. Since you’re working from a single log without glue, the connection relies on precise shaping and fitting. When the head fits snugly onto the handle, and the handle feels comfortable in your hand, you’ll have created a durable, natural tool that’s ready for work. This process emphasizes craftsmanship, patience, and understanding of the wood’s natural properties, resulting in a handcrafted mallet that’s both functional and satisfying to make. Additionally, understanding the grain orientation helps ensure the mallet’s longevity and performance over time.

VAUGHAN Rawhide Mallet, Non Marring, Hardwood Handle, 8 oz, 1M175, VN58214
Ideal for furniture assembly and shaping soft metals, VAUGHAN Rawhide Mallets deliver non-marring blows, ensuring your workpieces remain…
As an affiliate, we earn on qualifying purchases.
As an affiliate, we earn on qualifying purchases.
Frequently Asked Questions
What Types of Wood Are Best for Making a Mallet?
When choosing wood for a mallet, you want a balance of wood density and grain orientation. Hardwoods like maple, hickory, or oak are ideal because their high density provides durability and impact resistance. Guarantee the grain runs parallel to the handle for strength and to prevent splitting. Softer woods may wear quickly, so stick with dense, tight-grained options for a sturdy, long-lasting mallet.
How Long Does It Typically Take to Complete the Project?
Your project timeline depends on your skill level and experience. If you’re a beginner, it might take around 4 to 6 hours, including carving and finishing. More experienced woodworkers can complete it in about 2 to 4 hours. Factors like the tools you have and the complexity of your design also affect the timeline. Overall, plan for a relaxed pace, especially if you’re new to woodworking.
Do I Need Special Tools Beyond Basic Woodworking Equipment?
You don’t need special tools beyond basic woodworking equipment to make your wooden mallet. Just make certain you have a saw, chisel, hammer, and a rasp or sandpaper. Focus on woodworking safety: wear goggles and gloves, and work in a well-ventilated area. These basic tools are sufficient to shape and refine your mallet from a single log, making the process safe and straightforward.
How Do I Prevent the Wood From Cracking During Carving?
To prevent cracking during carving, make sure your wood is properly dried, ideally seasoned for at least six months, to reduce moisture content. Pay attention to grain orientation, carving along the grain rather than against it, to minimize stress. Keep your tools sharp for cleaner cuts, and carve gradually to avoid putting too much pressure on the wood. These steps help maintain the mallet’s integrity and prevent unwanted cracks.
Can This Technique Be Used for Larger or Smaller Mallets?
Thinking about scaling techniques, yes, you can craft larger or smaller mallets using this method. Just like a master chef adjusts ingredients for different dishes, you adapt your approach with alternative wood sources and precise shaping. For smaller mallets, focus on finer detail and controlled cuts, while larger ones need sturdy logs and patience. The key is to respect the wood’s natural grain, ensuring your mallet remains strong and crack-free, no matter the size.
Schaaf Wood Carving Tools Set of 12 Chisels with Canvas Case | Wood Carving Chisels with Razor Sharp CR-V 60 Steel Blades
Start any Project – Wood carving tool set features 12 versatile wood carving chisels and gouges you need…
As an affiliate, we earn on qualifying purchases.
As an affiliate, we earn on qualifying purchases.
Conclusion
Now you’ve crafted your wooden mallet entirely from a single log, no glue required—talk about old-school craftsmanship! Just like a true medieval blacksmith, you’ve relied on skill and patience rather than fancy tools or modern adhesives. So, next time you need a sturdy mallet, remember this simple, timeless method. It’s almost like summoning a wizard’s wand from the days of yore—crafting magic right in your own workshop. Now go forth and swing with confidence!

Wood Carving Hook, Professional Basic Crooked Knife Woodworking Hand Chisel Gouges Spoon Carving Tools for Carvers and Beginners
HOOK KNIFE FUNCTION: It is specially designed for round edge carving of wooden spoons, bowls, cups, spoons and…
As an affiliate, we earn on qualifying purchases.
As an affiliate, we earn on qualifying purchases.

C&T White Rubber Flooring Mallet with Replaceable Head,Non-Marring Head, Wood Handle, 1 Replacement head
This mallet is designed for use with flooring nailers.
As an affiliate, we earn on qualifying purchases.
As an affiliate, we earn on qualifying purchases.