
Segmented turning involves carefully cutting and joining multiple pieces to form intricate, eye-catching patterns. You need precision with sharp tools and accurate angled cuts to guarantee seamless joints. Clamping and proper securing during assembly help achieve a stable, professional look. Finishing touches like sanding and surface treatments enhance the design’s visual appeal. By mastering these techniques, you can create complex, multi-layered pieces. Keep exploring, and you’ll discover even more ways to elevate your craftsmanship.
Key Takeaways
- Precise angled cuts and templates ensure tight, seamless joints for complex segmented patterns.
- Proper surface preparation and finishing highlight intricate designs and enhance visual appeal.
- Clamping and secure gluing during assembly maintain alignment and structural stability of segments.
- Use of specialized tools like miter saws or jigs improves accuracy in fitting pieces together.
- Careful planning of patterns and consistent joint angles are essential for intricate, multi-sectioned designs.

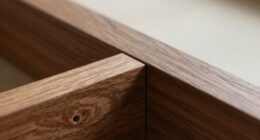
Have you ever wondered how skilled turners create complex, multi-sectioned designs on wood or metal? The secret often lies in segmented turning, a technique where multiple pieces are carefully joined together to form intricate patterns. This process demands precision and patience, as each segment must be cut and assembled with meticulous attention to detail. When working on these projects, your choice of cutting techniques becomes vital. Using sharp tools and proper methods ensures clean, accurate cuts, which are essential for fitting pieces seamlessly. Whether you’re slicing thin veneers or cutting larger sections, precision in your cuts directly impacts the final appearance and structural integrity of the piece. As you assemble segments, you’ll also want to consider finish options. The surface treatment can dramatically enhance the visual appeal of your work, highlighting the vibrant grains or contrasting colors of different woods or metals. You might choose a smooth, polished finish for a sleek, modern look or opt for a more textured surface to emphasize the layered construction. The variety of finish options allows you to customize each piece to match your aesthetic vision, from matte to high gloss, or even colored stains and dyes.
Getting the joints right is key in segmented turning, and this is where your cutting techniques come into play again. Precise angled cuts will ensure tight, seamless joints that not only look professional but also provide strength and stability. You might use a miter saw or a specialized jig to maintain consistent angles across all segments. The better your cuts, the easier it becomes to assemble your design accurately. Additionally, understanding the importance of proper tire pressure can help when working on pieces that involve mobility or transport, ensuring your tools and equipment stay in optimal condition during your projects. Once assembled, you’ll have to decide how to secure the pieces. Clamping during glue-up and careful sanding afterward can make all the difference in achieving a flawless surface. The finishing process then involves choosing the right finish options to protect your work and enhance its beauty. Whether you prefer a natural look with oil or varnish, or something more decorative with paint or inlays, your choices will influence how your piece is appreciated.
Segmented turning opens up endless creative possibilities, allowing you to craft eye-catching patterns and complex geometries that showcase your craftsmanship. Mastering your cutting techniques and exploring various finish options will elevate your work from simple turning to a true art form. With patience and skill, you can turn ordinary materials into extraordinary, multi-dimensional pieces that reflect your unique style and precision.

BENECREAT 9PCS Segmented Bowl Wedgies, Almond White Trapezoidal Segmented Bowl Wedge Tool Set for Segmented Bowl Making Jig, Sled, Wood Turning, 5mm Thick
Package: This set contains 9 different sizes of trapezoidal segmented bowl wedge tools for measuring and trimming various…
As an affiliate, we earn on qualifying purchases.
As an affiliate, we earn on qualifying purchases.
Frequently Asked Questions
What Are the Best Types of Wood for Segmented Turning?
You should choose woods with stable grain orientation and moderate density for segmented turning. Hardwoods like maple, cherry, and walnut are popular because their grain runs consistently, reducing warping. Avoid softwoods with uneven grain or high density variations, as they can cause cracking or difficulty in joining. Selecting stable, well-dried woods guarantees your pieces fit tightly and stay durable, making your intricate patterns look sharp and professional.
How Do I Prevent Gaps Between Segments During Assembly?
Gaps in your segments can feel like giant chasms, but you can conquer them! Choose a high-quality adhesive like CA glue or epoxy for strong, gap-filling bonds. Guarantee perfect joint alignment by carefully clamping your pieces, checking for tight fit before the adhesive sets. Take your time and double-check each joint—precision now prevents gaps later, making your project stunningly seamless.
What Tools Are Essential for Precise Segment Cutting?
You need precise measuring tools like calipers and a ruler to mark accurate cut lines, ensuring each segment fits perfectly. Use sharp cutting equipment such as a fine-toothed saw or a high-quality chisel for clean, accurate cuts. Double-check your measurements before cutting, and always cut slowly and steadily to avoid mistakes. Proper tools help you achieve tight joints and seamless patterns in your segmented turning projects.
How Can I Reinforce Large or Complex Segmented Pieces?
Imagine your masterpiece needing gentle armor, and you can accomplish this with the right reinforcement methods. Use strong adhesive techniques like high-quality wood glue or epoxy to bond your pieces securely. For added strength, consider internal reinforcements such as dowels or splines, and clamp everything firmly during drying. These methods ensure your large or complex segmented pieces stay intact, allowing your intricate designs to shine with stability and grace.
Are There Digital Resources or Software for Designing Patterns?
Yes, you can find digital design and pattern software to help you create intricate segmented turning patterns. Programs like Adobe Illustrator, CorelDRAW, and specialized CAD software allow you to design precise, complex patterns before cutting or assembling. These tools give you detailed control over your design, making it easier to visualize and execute your patterns accurately, ultimately enhancing your segmented turning projects with professional-quality results.

Metabo HPT 10-Inch Single Bevel Compound Miter Saw, 15-Amp Power Saw with Xact Cut Shadow Line, Precision Miter Angles, Single Bevel 0-45°, 40T TCT Miter Saw Blade, Lightweight Design, C10FCG2
POWERFUL AND PRECISE: This 10-inch single bevel compound miter saw features a 15-Amp motor delivering high power for…
As an affiliate, we earn on qualifying purchases.
As an affiliate, we earn on qualifying purchases.
Conclusion
With segmented turning, you shape intricate patterns piece by piece, carving beauty from chaos. You join, align, and assemble, creating flowing lines and complex designs. You turn wood into art, patience into perfection, and imagination into reality. Each joint, each segment, becomes part of a larger masterpiece—a tribute to your craftsmanship. Embrace the challenge, enjoy the process, and watch your vision come alive—one beautiful, seamless pattern at a time.

HORUSDY 8-Pack Bar Clamps for Woodworking, 12" and 6" Bar Clamps, Wood Working Clamp Sets, Quick Clamps F Clamp with 150 LBS Load Limit (8-Pack Wood Clamps)
1. The complete set includes 4pcs 6" bar clamps,2pcs 12" bar clamps and 2pcs 6" spring clamps, which…
As an affiliate, we earn on qualifying purchases.
As an affiliate, we earn on qualifying purchases.

Tried & True Superior Varnish Oil Wood Finish, Pint – Natural Pine Resin & Linseed Oil, Ideal for Interior Furniture, Tables, Countertops – Non-Toxic, Scratch Resistant & Durable
SUPERIOR BLEND OF LINSEED & NATURAL PINE RESIN: Tried and True varnish oil is a superior blend of…
As an affiliate, we earn on qualifying purchases.
As an affiliate, we earn on qualifying purchases.