Combining pyrography with stain and paint lets you transform simple woodburning into vibrant, textured art. You can add color, shading, and depth that make your designs stand out. The key is choosing the right wood, preparing your surface, and layering colors gradually. Using stains for tinting and paints for highlights allows you to create realistic effects and explore new artistic possibilities. Keep exploring these techniques to elevate your pyrography projects even further.
Key Takeaways
- Combining pyrography with stain and paint enhances artwork by adding vibrant colors, shading, and depth to burned designs.
- Proper wood selection and surface preparation are crucial for optimal absorption of stain and paint, improving visual effects.
- Layering stains and paints, starting with light tones and gradually building darker shades, creates realistic gradients and dimension.
- Using fine brushes and blending techniques helps seamlessly integrate colors, highlighting details and natural wood grain.
- This combination expands artistic possibilities, allowing for more complex, textured, and visually striking pyrography projects.
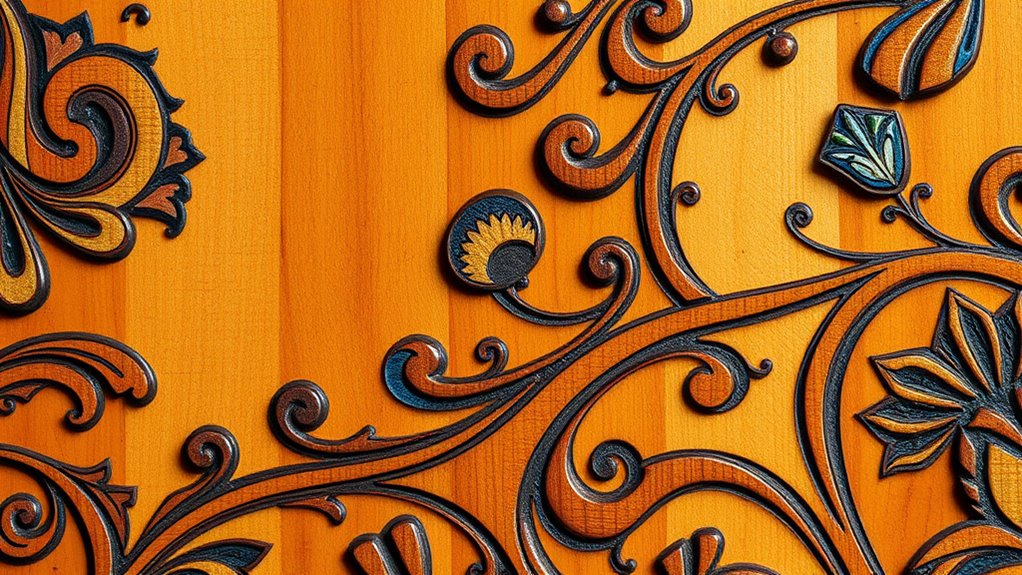
Pyrography with stain and paint opens up a world of creative possibilities for woodburning enthusiasts. When you combine these mediums, you gain the ability to enhance your designs with vibrant colors and subtle shading, transforming simple burn marks into stunning works of art. One of the key elements to master in this process is understanding the wood grain. The natural flow and pattern of the grain influence how stain and paint sit on the surface, making it essential to select the right wood and work with its unique characteristics. You’ll find that the wood grain can add depth and texture to your piece, especially when you incorporate color blending techniques. By carefully layering stain and paint, you can create smooth progressions, highlighting the wood’s natural patterns while adding a splash of color that makes your design truly stand out.
Color blending in pyrography with stain and paint allows you to add realism and dimension to your artwork. Instead of just burning your design onto the wood, you can use stains to tint the surface and paints to add highlights and shadows. This process involves layering different shades, gradually blending them to achieve seamless gradients. For example, you might start with a light stain to emphasize the wood grain, then build up darker hues to create shadows and depth. When applying paint, you can use blending techniques like feathering or dry brushing to soften progressions and mimic natural color variations. This approach not only enriches your design but also brings a sense of movement and life to your work.
To succeed with stain and paint in pyrography, preparation is vital. Sand your wood surface smoothly to guarantee even absorption of stains and paints. Test your colors on a scrap piece to understand how they interact with the wood grain and each other. When applying stain, use a cloth or brush to control the amount and direction, highlighting the grain’s natural lines. Once dried, add paint with fine brushes, paying attention to how colors blend at the edges. Keep in mind that layering is key; start with light shades and gradually deepen your colors. Patience is essential—allow each layer to dry completely before adding the next. With practice, you’ll develop an eye for color blending and texture, making your pyrography projects more vibrant and engaging.
Combining pyrography with stain and paint truly elevates your craft, offering endless opportunities to experiment and create. By understanding the wood grain and mastering color blending, you can produce pieces that are rich in detail and depth. Whether you aim for subtle shading or bold color contrasts, this approach allows you to push your artistic boundaries and craft unique, eye-catching artworks.

DeVilbiss 802342 StartingLine HVLP Gravity Spray Gun Kit, 2.7, Factory
VERSATILE SPRAY GUN KITS: The 1.3mm fluid tip is ideal for atomizing base coats; clear coats; and light-viscosity...
As an affiliate, we earn on qualifying purchases.
Frequently Asked Questions
How Do I Prevent Paint From Smudging Over Pyrography?
To prevent paint from smudging over pyrography, you should first seal the artwork with a compatible sealing technique, like a clear spray or varnish, ensuring it’s completely dry before painting. Always check paint compatibility with your sealant to avoid reactions. Applying thin, even layers of paint and allowing each layer to dry thoroughly helps prevent smudging. This approach keeps your pyrography crisp and your paint intact.
What Types of Stain Work Best With Pyrography Designs?
Think of choosing stain for pyrography like selecting the perfect spices for a dish. Oil-based stains work best because they seep into the wood, enhancing the grain and providing a rich background for your designs. Use light-colored stains for subtle wood grain enhancement, and employ color blending techniques for seamless progression. Test on scrap wood first to make certain your chosen stain complements the burned design and achieves the desired effect.
Can I Use Water-Based Paints With Pyrography?
Yes, you can use water-based paints with pyrography, but you need to be careful. Make sure your pyrography techniques don’t burn too deeply, as this can cause paint to seep or not adhere well. Lightly sand the surface beforehand for better paint adhesion, and use a primer if needed. Water-based paints are a good choice because they dry quickly and are easy to work with, giving your pyrography art a vibrant finish.
How Long Should I Wait Before Adding Paint or Stain?
You should wait at least 24 hours after pyrography before adding paint or stain to let the wood grain settle and make certain surface preparation is complete. Rushing it might cause smudges or uneven coverage, which is ironic since you’re trying to enhance the design. Patience pays off—giving the wood time to dry prevents mishaps and guarantees your artwork looks crisp and professional.
Is It Necessary to Seal the Artwork After Finishing?
Yes, sealing your artwork is essential after finishing. You should use appropriate sealing techniques to protect it from damage, dirt, and fading. Applying a protective coating, like a clear acrylic or varnish, helps preserve the pyrography, stain, and paint. Make sure the surface is fully dry before sealing, and choose a finish that enhances your artwork’s appearance. Sealing guarantees your piece stays vibrant and lasts longer.

VONFORN Paint Sprayer, 700W HVLP Spray Gun with Cleaning & Blowing Joints, 4 Nozzles and 3 Patterns, Easy to Clean, for Furniture, Cabinets, Fence, Walls, Door, Garden Chairs etc. VF803 Yellow
【4 Nozzles & 3 Spray Patterns】VONFORN 700W paint sprayer equipped with 4 size nozzles(1mm,1.5mm,2mm, 3.0mm) for most painting...
As an affiliate, we earn on qualifying purchases.
Conclusion
By blending pyrography with stain and paint, you open a world of creative possibilities, turning simple wood into a stunning masterpiece. Don’t be afraid to experiment—think of it as your own personal Da Vinci’s workshop, but in the 21st century. With patience and imagination, you’ll craft pieces that truly stand out. So, grab your tools, channel your inner artist, and make your woodworking projects legendary—just like the great artisans of yore, armed with nothing but a modern-day quill and a spark of genius.

Paint Sprayer Indoor Outdoor, 1000W Electric Handheld HVLP Spray Paint Gun with 3 Patterns 6 Nozzles, Easy to Clean & Use, Stain Sprayer for House Painting, Furniture, Cabinets, Walls, Doors, Fences
【Powerful 1000W Motor — Fast, Efficient, Reliable】Powered by a robust 1000W aluminum-wrapped copper motor, this paint sprayer delivers...
As an affiliate, we earn on qualifying purchases.

VONFORN Paint Sprayer, 700W HVLP Spray Gun with Cleaning & Blowing Joints, 4 Nozzles and 3 Patterns, Easy to Clean, for Furniture, Cabinets, Fence, Walls, Door, Garden Chairs etc. VF803 Orange
【4 Nozzles & 3 Spray Patterns】VONFORN 700W paint sprayer equipped with 4 size nozzles(1mm,1.5mm,2mm, 3.0mm) for most painting...
As an affiliate, we earn on qualifying purchases.