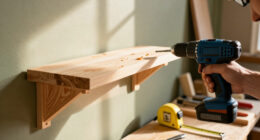

This guide provides clear instructions for using a cordless power drill to drill holes and insert screws. It is designed for beginners or DIY enthusiasts with little to no prior experience. Completing this task correctly will help you perform small to medium projects safely and effectively, whether assembling furniture, installing shelves, or doing home repairs. Expect to spend about 30 to 60 minutes learning and practicing the basics of operation, safety, and technique.

Get business pricing on tools and workshop supplies
- Business-only prices and quantity discounts
- Tax-exempt purchasing
- Multiple users, one account, clear invoices

DeWalt 20V Max Cordless Drill Driver Set, 2-Speed, Includes Batteries and Charger
- ✔ Power: 20V Max
- ✔ Motor: High performance
- ✔ Speed: 0-450 & 1,500 rpm

BLACK+DECKER 20V MAX* PowerConnect Cordless Drill Driver Kit with 100-Piece Bit Set
- ✔ Battery: 20V MAX* lithium-ion
- ✔ Clutch: 24-position
- ✔ Included: 100-piece bit and accessory set
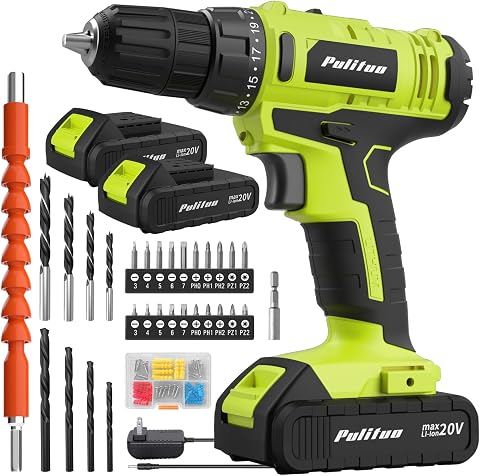
PULITUO’S 20V Cordless Drill/Driver with 2 Batteries, 30Nm Torque, 21+1 Settings, 2-Speed, LED Light, 34-Piece Kit
- ✔ Voltage: 20V
- ✔ Max Torque: 30 N.m (266 in-lb)
- ✔ Speed Settings: 2 (0-400, 0-1500 RPM)
Difficulty: Beginner | Time: 30-60 minutes
What You’ll Need
Tools & Materials:
- Cordless power drill
- Charged battery pack
- Set of drill bits
- Screwdriver bits
- Safety glasses
- Measuring tape
- Pencil or marker
Knowledge:
- Basic understanding of power tools
- Ability to read measurements and markings
Ensure the drill is fully charged before starting. Have safety glasses and appropriate clothing ready. Select the right drill bit and screw bit for your task to avoid damage or accidents.
DeWalt 20V Max Cordless Drill Driver Set, 2-Speed, Includes Batteries and Charger
<p>This <strong>DeWalt 20V Max Cordless Drill</strong> stands out for its <strong>lightweight design</strong> and ergonomic feel, making it a top choice for extended use. Its <strong>two-speed motor</strong> allows for precise control across various tasks, from drilling into wood to fastening screws. Compared with other options, it offers a <strong>high-performance motor</strong> without the bulk, making it suitable for homeowners and DIY enthusiasts. However, it’s not designed for heavy-duty industrial work or drilling into concrete, which requires more robust tools. The included batteries and charger add value, but the limited battery capacity means it may need frequent recharging during intensive projects. Overall, this model provides a <strong>solid balance of power and comfort</strong>.</p>
Pros:
- Lightweight and ergonomic for comfortable extended use
- Two-speed transmission offers versatility
- Includes batteries and charger for convenience
Cons:
- Limited for heavy-duty industrial applications
- Not suitable for drilling into concrete or masonry
Best for: Homeowners and DIYers seeking a reliable, lightweight drill for general tasks
Not ideal for: Heavy-duty construction or masonry work
Bottom line: A well-rounded, lightweight drill ideal for light to medium tasks with excellent portability.
“A well-rounded, lightweight drill ideal for light to medium tasks with excellent portability.”
BLACK+DECKER 20V MAX* PowerConnect Cordless Drill Driver Kit with 100-Piece Bit Set
<p>The <strong>BLACK+DECKER PowerConnect Kit</strong> is designed for users who want a <strong>comprehensive set</strong> with many accessories and system flexibility. Its <strong>24-position clutch</strong> provides precision, while the <strong>soft-grip handle</strong> ensures comfort during prolonged use. The standout feature is its <strong>interchangeable battery system</strong>, allowing you to swap batteries across multiple tools within the PowerConnect ecosystem, which can be a major convenience. However, the <strong>battery life may be limited</strong> for very heavy tasks, and some users find it slightly heavier than comparable models. Its versatility makes it perfect for hobbyists or professionals handling a variety of projects, though it might be overkill for those only doing occasional light work.</p>
Pros:
- Powerful 20V lithium-ion battery for reliable performance
- Includes a 100-piece accessory kit for diverse tasks
- Interchangeable batteries enhance versatility
Cons:
- Battery life may fall short during extended heavy-duty use
- Slightly heavier weight can cause fatigue over long periods
Best for: Users needing a versatile kit with extensive accessories and system compatibility
Not ideal for: Heavy industrial use or prolonged drilling sessions without additional batteries
Bottom line: A versatile, accessory-rich drill kit suited for varied projects, especially where system compatibility matters.
“A versatile, accessory-rich drill kit suited for varied projects, especially where system compatibility matters.”
PULITUO’S 20V Cordless Drill/Driver with 2 Batteries, 30Nm Torque, 21+1 Settings, 2-Speed, LED Light, 34-Piece Kit
<p>The <strong>PULITUO 20V Cordless Drill</strong> offers <strong>more power with 30 N.m torque</strong>, making it suitable for tougher tasks. Its <strong>adjustable speed and torque settings</strong> provide fine control, while the <strong>built-in LED light</strong> helps illuminate dark workspaces. The inclusion of <strong>two rechargeable batteries</strong> reduces downtime, and the extensive <strong>34-piece accessory kit</strong> makes it a versatile choice for both beginners and experienced users. Compared to the DeWalt, it provides more torque and features, but it tends to be slightly heavier and may have limited battery life during prolonged heavy-duty use. Its comprehensive features make it a good all-around choice for those who want power and variety in one package.</p>
Pros:
- Powerful 30 N.m torque for tough jobs
- Includes two batteries for extended use
- 34-piece kit covers most project needs
- Built-in LED light for working in dark areas
Cons:
- Battery life may be limited under heavy load
- Weight could be an issue for prolonged use
Best for: Users needing a powerful, feature-rich drill for demanding tasks
Not ideal for: Light DIY tasks or users seeking a lightweight, minimalistic tool
Bottom line: A powerful, feature-packed drill ideal for demanding projects, offering excellent value with its comprehensive kit.
“A powerful, feature-packed drill ideal for demanding projects, offering excellent value with its comprehensive kit.”
As an Amazon Associate we earn from qualifying purchases.
Before You Start
Check the drill’s battery is fully charged to avoid interruptions. Confirm that you have the correct drill bit or screwdriver bit attached. Clear the workspace of obstructions, and wear safety glasses to protect your eyes from debris. Familiarize yourself with the drill’s controls—mainly the trigger, forward/reverse switch, and speed settings.
Step-by-Step Instructions
Step 1: Select the appropriate drill bit or screwdriver bit
Choose a drill bit suitable for the material you plan to work with, such as wood, metal, or masonry. Attach the bit securely into the drill’s chuck, tightening it by rotating the chuck clockwise until the bit is firmly held. For screw driving, select the correct screwdriver bit and insert it similarly.
Tip: Use a keyless chuck for quick bit changes. Ensure the bit is centered and clamped tightly to prevent slipping.
Check: The bit is securely attached and does not wobble when you gently shake the drill or try to turn it by hand.
Step 2: Adjust the torque and speed settings
Set the torque limit on the drill if it has a torque adjustment ring, especially for screw driving, to prevent overdriving or cam-out. For drilling, select the appropriate speed—higher for softer materials like wood, lower for harder materials like metal or masonry.
Tip: Start with a lower torque setting and increase as needed. Use the lowest speed for delicate tasks and higher speeds for larger holes.
Check: Settings are adjusted correctly for your task, and the drill responds smoothly when activated.
Step 3: Mark the drilling or screw location
Use a pencil or marker to mark precisely where you want to drill or insert a screw. Measure and double-check the position before proceeding to ensure accuracy.
Tip: Use a level or straightedge for alignment if installing multiple screws or drilling in a straight line.
Check: The mark is clear and correctly positioned on your surface.
Step 4: Secure the material or workpiece
If possible, clamp or hold the material firmly in place to prevent movement during drilling or screw driving. This improves accuracy and safety.
Tip: Use clamps or a vise for larger pieces. Keep your hands clear of the drill’s path.
Check: The workpiece remains stable during operation, with no shifting or slipping.
Step 5: Position the drill and start drilling or driving
Align the drill bit tip with your mark. Hold the drill firmly with both hands, with your index finger on the trigger. Squeeze the trigger gradually to start the drill at a controlled speed, then increase pressure as the bit begins to cut into the material.
Tip: Apply steady, moderate pressure—too much can cause the bit to bind or break; too little may cause wandering or slow progress.
Check: The drill bit cuts into the material cleanly, producing a precise hole or a smooth screw insertion without slipping or wandering.
Step 6: Complete the drilling or screw driving process
Maintain steady pressure until the drill bit has gone through the material or the screw is flush with the surface. Release the trigger smoothly to stop the drill.
Tip: For deep holes, periodically pull the drill out to clear debris and prevent overheating.
Check: The hole is clean and of the expected diameter, or the screw is fully seated without stripping or over-driving.
Step 7: Remove the drill bit or screwdriver bit and inspect
Depress the chuck’s release mechanism or rotate the chuck counterclockwise to loosen and remove the bit. Check the workpiece for proper hole size or screw seating, and clean up any debris.
Tip: Handle bits carefully to avoid damage or injury, and store bits in a designated case for future use.
Check: Bits are removed easily, and the work matches your intended outcome, with no signs of damage or improper installation.
Common Mistakes to Avoid
- Using an incorrect or dull drill bit — Select the right bit for your material and replace dull bits with sharp ones to ensure clean cuts and reduce strain on the drill.
- Applying excessive pressure during drilling or screwing — Maintain steady, moderate pressure; let the drill do the work to avoid breaking bits or stripping screws.
- Overlooking safety gear or workspace clearance — Always wear safety glasses and clear the area of clutter before starting to prevent accidents and ensure control.
Troubleshooting
Problem: Drill bit slips or wanders off the mark
Solution: Stop drilling, re-mark the location, and apply light pressure at a slow speed. Consider using a center punch to create a small indentation for guidance.
Problem: Battery runs out quickly or drill stops working
Solution: Recharge the battery fully and ensure contacts are clean. Use a spare battery if available, or avoid overusing high-power settings.
Problem: Screws strip or do not go in fully
Solution: Reduce torque or speed, ensure the screw is compatible with the material, and avoid overtightening. Use a new screw if the current one is damaged.
What Success Looks Like
The drill produces clean, accurate holes in the desired material, with no wandering or splitting. Screws are driven flush or slightly below the surface without stripping or damaging the material. The workpiece remains stable, and the drill operates smoothly without excessive noise or vibration.
Next Steps
Clean and store your drill and bits properly after use. Practice on scrap material to improve accuracy. Consider trying different bit sizes or materials for future projects. Always check your work for safety and precision before proceeding with assembly or finishing.
Frequently Asked Questions
Can I use the same drill bit for wood and metal?
It’s best to use specific bits designed for each material. Wood bits are sharper and have different cutting edges than metal bits. Using the correct bit improves results and prolongs tool life.
How do I know when to replace my drill bits?
Replace bits when they become dull, chipped, or lose their sharpness. Dull bits require more force and can cause poor-quality holes or damage to the material.
What safety precautions should I take when using a cordless drill?
Always wear safety glasses, keep loose clothing or jewelry away from moving parts, secure your workpiece, and avoid overloading the drill. Work in a well-lit area and keep your hands clear of the drill bit’s path.
Columbus Day / Indigenous Peoples' Day Picks
long weekend sales
As an affiliate, we earn on qualifying purchases.