
To cut thin strips safely on a table saw, make certain your blade is sharp, properly aligned, and equipped with safety features like guards and a riving knife. Use a zero-clearance insert or custom jig to support your workpiece, and adjust it to the desired width. Feed the wood slowly and steadily, keeping your hands clear with push sticks. For more expert tips on safe, accurate cuts, continue exploring the key techniques.
Key Takeaways
- Use a properly aligned, sharp blade and safety features like guards to prevent kickback and ensure clean cuts.
- Create a zero-clearance insert or custom jig tailored to the strip width for stability and precise guidance.
- Clamp the jig securely and keep the workpiece tight against the fence to maintain accuracy and safety.
- Feed the wood slowly and steadily, using push sticks or feather boards to keep fingers away from the blade.
- Turn off the saw and wait for the blade to stop completely before removing cut strips or making adjustments.

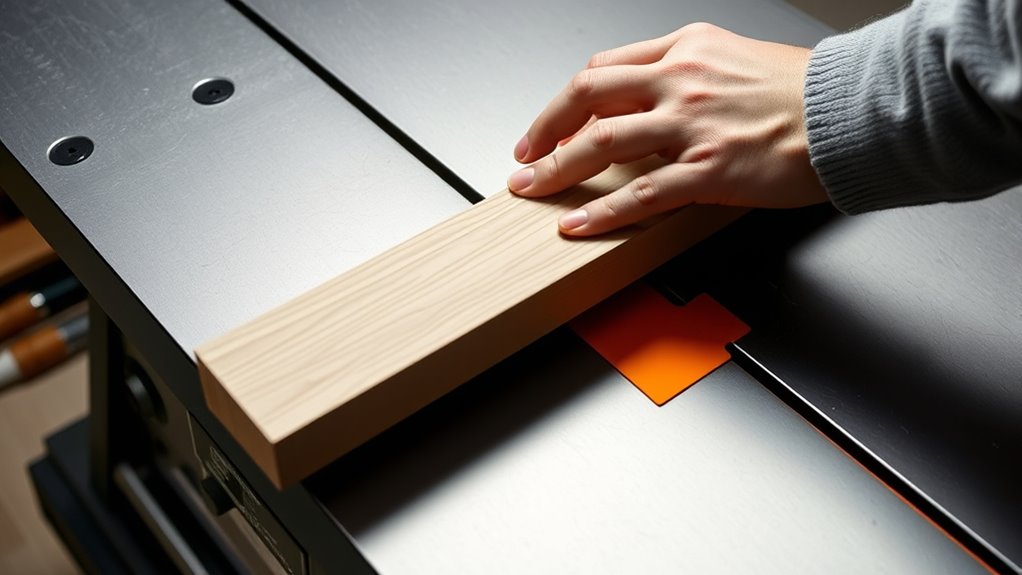
Cutting thin strips on a table saw can be challenging, but with the right technique and safety precautions, you can achieve clean, precise results. The key lies in understanding blade safety and setting up an effective jig to guide your cuts. Your first priority should always be safety; a sharp, properly installed blade reduces the risk of binding or kickback, which are common hazards when working with thin strips. Before you begin, double-check that the blade is correctly aligned and tightened, and that your saw’s safety features, like blade guards and riving knives, are in place. Using a thin-kerf blade can also make the cut easier, requiring less power and producing less waste, which is perfect for delicate strips.
Prioritize safety with a sharp, aligned blade and proper safety features for clean, precise thin strips.
Next, focus on jig setup. Creating a zero-clearance insert or a custom jig tailored to your specific width ensures stability and minimizes tear-out. A well-designed jig acts as an extension of your hands, guiding the wood smoothly through the cut while keeping your fingers at a safe distance. When setting up your jig, measure the width of the thin strips you want to cut, and adjust the jig accordingly to hold the wood securely against the fence. This stability prevents the wood from shifting or twisting during the cut, which could cause kickback or uneven edges. Clamp the jig firmly to the table to avoid any movement, and always keep your workpiece tight against the fence throughout the process.
When making the cut, position the wood so that it feeds into the blade slowly and steadily. Never push too hard; let the blade do the work. Keep your hands clear of the blade and use push sticks or feather boards when necessary to maintain control. Remember, blade safety isn’t just about the blade itself; it’s about how you handle the wood and your setup. A clean, straight cut depends heavily on your jig setup, so take the time to align everything properly before making the cut. If you’re cutting multiple strips, measure and adjust your jig as needed to ensure consistency. Additionally, being aware of the wood materials you’re working with can influence your cutting technique and safety measures, especially when dealing with softer or more brittle woods.
Finally, after finishing your cut, turn off the saw and wait for the blade to come to a complete stop before removing your workpiece or adjusting the setup. Proper blade safety and a carefully prepared jig not only protect you from injury but also help you produce thin strips with precision and minimal waste. With patience and attention to detail, you’ll master cutting thin strips on your table saw safely and efficiently.

DEWALT Router, Fixed Base, 12-Amp, 24,000 RPM Variable Speed Trigger, 2-1/4HP, Corded (DW618)
2-1/4 HP (maximum motor HP), 12.0 Amp electronic variable speed motor provides the power to rout smoothly through...
As an affiliate, we earn on qualifying purchases.
Frequently Asked Questions
Can I Use a Regular Saw Blade for Thin Strips?
You can use a regular saw blade for thin strips, but it’s not ideal. Blade selection matters because thin strips can easily get pinched or kick back if the blade isn’t designed for precise, narrow cuts. Additionally, regularly sharpening your blade guarantees smooth cuts and reduces tear-out. For best safety and quality, consider using a blade specifically designed for fine cuts, and keep it sharp to avoid accidents and achieve cleaner results.
What Safety Gear Is Recommended When Cutting Thin Strips?
Imagine a tiny splinter flying toward your eye—that’s why safety gear matters. When cutting thin strips, you should always wear safety goggles to protect your eyes and a dust mask to prevent inhaling fine sawdust. These precautions keep you safe from potential hazards and make certain a clean workspace. Don’t take chances; gear up with safety goggles and a dust mask every time you operate the saw, especially with delicate cuts.
How Do I Prevent Kickback During Thin Strip Cuts?
To prevent kickback when cutting thin strips, make sure your blade is properly aligned to guarantee smooth cuts. Use a push stick to keep your fingers safe and maintain control. Additionally, connect a dust collection system to keep the area clear of debris, which can cause the workpiece to slip. These steps help reduce the risk of kickback, making your cuts safer and more precise.
Is It Better to Use a Push Stick or Push Block?
Imagine guiding a delicate thread through a needle—precision is key. When deciding between a push stick or push block, think of the push stick as a quick handshake, ideal for narrow cuts, while the push block offers control like a steady hand. Use a push stick for small, thin strips to keep your fingers safe, but opt for a push block when handling larger pieces for better stability and control.
How Do I Maintain Accuracy on Small, Narrow Cuts?
To maintain accuracy on small, narrow cuts, focus on measuring precision and proper blade alignment. Double-check your measurements before cutting, using a reliable square or gauge for accuracy. Make sure your blade is aligned correctly with the miter slot and fence to prevent wandering. Use push sticks or blocks to keep control, and take your time. Consistent setup and careful attention to detail help you achieve precise, safe cuts every time.

SKIL 14 Amp Plunge and Fixed Base Router Combo — RT1322-00
14 AMP PLUNGE ROUTER - Powerful 14 Amp, 2.5 HP motor includes both fixed and plunge bases for...
As an affiliate, we earn on qualifying purchases.
Conclusion
Remember, safety first—always use a zero-clearance guide when cutting thin strips on your table saw. It not only keeps your fingers safe but also guarantees cleaner, more precise cuts. As the saying goes, “A stitch in time saves nine,” so taking a moment to set up properly now prevents accidents later. With the right precautions, you can enjoy your woodworking projects confidently and safely. Happy cutting!

Bosch 1617EVSPK 2.25 HP Combination Plunge- and Fixed-Base Router
ROUTER'S 12-AMP MOTOR IS POWERFUL, AND IT INCLUDES ADJUSTABLE SPEED SETTINGS
As an affiliate, we earn on qualifying purchases.

Bosch MRF23EVS-RT 2.3 hp Fixed-Base Router (Renewed)
2.3 HP motor produces 10,000 - 25,000 RPM
As an affiliate, we earn on qualifying purchases.