To repair chipped veneer, start by patching larger areas with a matching veneer patch glued securely and smoothed for a seamless look. For small chips, use a suitable wood filler that matches the veneer color, then sand gently to blend it into the surface. To hide repairs further, mimic the natural grain pattern with stain or fine brushes, carefully blending to create a natural finish. Continue exploring these techniques to achieve an invisible and professional repair.
Key Takeaways
- Use matching wood filler to repair small chips, then sand smooth for seamless blending.
- For larger damage, cut a veneer patch, glue, and sand edges to integrate with surrounding veneer.
- Apply stain or paint to replicate natural grain, enhancing concealment of repairs.
- Carefully match filler or stain color and take time to ensure a natural, invisible finish.
- Lightly sand after filling or staining to achieve a smooth, professional-looking surface.

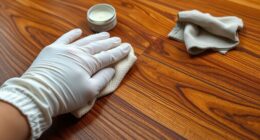
A chipped veneer can detract from the appearance of your furniture or cabinetry, but fixing it is often straightforward. One effective way to repair small chips is by using wood filler designed for veneer repairs. Wood filler is versatile, easy to work with, and adheres well to the veneer surface. To guarantee a seamless repair, choose a filler that matches the color of your veneer or can be easily tinted to blend in. Color matching is essential because a mismatched filler can draw attention to the repair rather than conceal it. Before applying the filler, clean the chipped area thoroughly to remove dust, dirt, and grease, which can interfere with adhesion. Use a putty knife to carefully press the wood filler into the chip, ensuring it’s filled flush with the surrounding surface. Once the filler dries—usually within a few hours—you can sand it lightly with fine-grit sandpaper to smooth out any unevenness. Be gentle to avoid damaging the surrounding veneer.
If the chip exposes the underlying substrate or the repair area is large, you might consider patching the damaged section. Selecting a veneer patch that matches your original veneer in color and grain pattern can make the repair less noticeable. Cut the patch slightly larger than the damaged area, then glue it in place using a veneer adhesive or contact cement, pressing it firmly until it bonds securely. After the patch has set, sand the edges smoothly to blend it with the surrounding surface. For a more refined finish, you can use grain painting techniques, which involve applying stain or paint to mimic the natural grain of the veneer. Grain painting is particularly useful when the damage is extensive or the veneer is highly decorative. To do this, first, stain the patched or filled area with a color that closely matches the surrounding veneer, then use fine brushes or specialized grain tools to draw in the grain pattern. This process requires patience and a steady hand but yields results that are almost indistinguishable from the original.
Additionally, understanding the horsepower of electric dirt bikes can help you choose the right power for your needs, especially if you plan to incorporate electric bikes into your repair or renovation projects, such as transporting materials or tools. Throughout the repair process, take your time to ensure each step is precise. Properly matching the color of the filler or stain and carefully blending the repair into the existing veneer can restore your furniture’s appearance beautifully. With patience and the right materials, you can make chips and scratches virtually disappear, leaving your furniture looking as good as new.
Frequently Asked Questions
Can Chipped Veneer Be Repaired Without Professional Help?
Yes, you can repair chipped veneer yourself. Start with DIY fixes like using wood filler or veneer repair paste, then sand lightly once it dries. Choose matching material choices like a veneer patch or touch-up pens for color consistency. For small chips, these methods work well and save you money. Just follow the instructions carefully, and you’ll effectively restore your veneer without needing professional help.
How Long Does a Veneer Repair Typically Last?
Veneer repair typically lasts between 3 to 10 years, depending on veneer durability and repair longevity. If you use quality materials and proper techniques, your fix can stay intact longer. Keep in mind that exposure to moisture, heat, and regular wear can reduce the repair’s lifespan. To maximize durability, protect the area, avoid heavy impacts, and consider refinishing or sealing the surface to extend the repair’s life.
Are There Eco-Friendly Options for Veneer Patching?
Imagine a patch blending seamlessly, like a leaf nestled in a lush forest. You can choose eco-friendly adhesives and sustainable veneer options that minimize environmental impact while restoring your furniture’s beauty. These alternatives are safe, biodegradable, and often made from renewable materials, ensuring your repairs are both durable and kind to the planet. By selecting eco-conscious products, you contribute to a healthier environment while maintaining the elegance of your piece.
What Tools Are Essential for Repairing Chipped Veneer?
To repair chipped veneer, you need a tools checklist that includes a putty knife, fine sandpaper, wood filler or epoxy, a small spatula, and a paintbrush. These tools help you execute effective repair techniques like filling, smoothing, and blending the damaged area. Make sure you have a damp cloth for cleaning and matching stain or finish. With these tools, you can achieve a seamless repair that restores your surface effortlessly.
Can Damaged Veneer Be Repaired Multiple Times?
Yes, you can repair damaged veneer multiple times, but keep in mind that veneer durability diminishes with frequent repairs. Each repair may weaken the surface, making it more prone to future damage. To extend repair frequency, use proper patching techniques and grain painting to blend repairs seamlessly. Avoid over-repairing, and consider replacing severely damaged veneer for long-lasting results. Proper care ensures your veneer remains beautiful and durable longer.
Conclusion
With a little patience and the right techniques, you can turn a chipped veneer into a smooth, flawless surface. Think of your repair as a brushstroke in restoring a masterpiece—each careful touch brings your furniture back to life. Don’t be discouraged by imperfections; they’re just part of the journey to perfection. With steady hands and a bit of artistry, your piece will shine like new, telling a story of care and craftsmanship.