To reattach mouldings and trim without visible nails, start by carefully removing any existing nails using a pry bar or nail punch, then fill the holes with wood filler and sand smooth. Apply a strong, paintable adhesive like polyurethane or hybrid polymer in a zigzag pattern, pressing the trim firmly into place. Use painter’s tape or clamps to hold it during curing. For a seamless finish, finish with touch-up paint or filler to hide any minor imperfections, and discover more tips ahead.
Key Takeaways
- Use strong adhesive like polyurethane or hybrid polymer for a secure, nail-free bond to wood and drywall.
- Properly prepare surfaces by removing old nails and filling holes with wood filler for a smooth, clean base.
- Apply adhesive evenly with a caulking gun, press the trim firmly into place, and hold with painter’s tape or clamps during curing.
- Conceal seams and imperfections with paint or finish after adhesive has fully cured for a seamless appearance.
- Ensure the trim is securely attached, aligned correctly, and free of residual adhesive for a polished, nail-free look.

Have you ever noticed how mouldings and trim can add character to your space but also become loose or damaged over time? When that happens, you might hesitate to repair them because you don’t want unsightly nails or holes ruining the look. Luckily, there are ways to reattach mouldings and trim without leaving visible nails, giving your space a clean, polished appearance. The key is choosing the right adhesive types and knowing the proper nail removal techniques to prepare the surface properly.
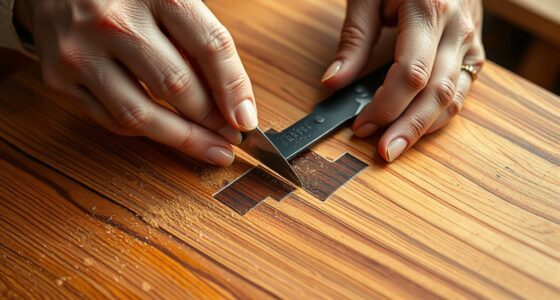
First, understanding the different adhesive types is essential. For mouldings and trim, strong construction adhesives like polyurethane or hybrid polymer adhesives work best. These adhesives bond well to wood, drywall, and other common surfaces, providing a durable hold without the need for nails. When applying, use a caulking gun to spread the adhesive evenly along the back of the trim before pressing it into place. Make sure to hold it firmly for a few minutes to allow the adhesive to set. For smaller or intricate pieces, double-sided construction tape can also work as a temporary fix until you can apply a more permanent adhesive.
Strong construction adhesives like polyurethane and hybrid polymers provide durable, nail-free bonding for mouldings and trim.
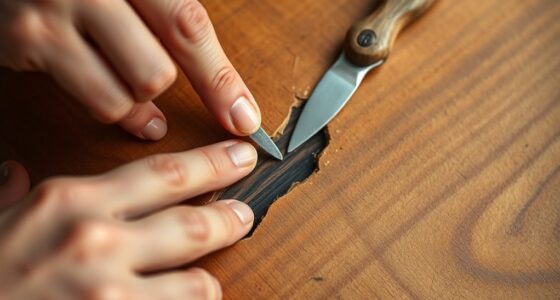
Before you start gluing, you’ll need to remove any existing nails carefully. Using nail removal techniques such as a pry bar or a nail punch helps to extract nails without damaging the surrounding surface. If nails are stubborn, gently tapping the nail punch under the nail head with a hammer can lift them out smoothly. Sometimes, nails are embedded deeply or are rusted, so you might need to drill small pilot holes or use pliers to grip and pull them out. Once nails are removed, fill any remaining holes with wood filler or spackle, sanding smooth once dry. This step ensures a seamless surface for your adhesive bond. Additionally, proper surface preparation can significantly improve the adhesion and longevity of your repair.
When reattaching the moulding or trim, apply the adhesive in a zigzag pattern or dots for even coverage. Press the piece firmly against the wall or ceiling, aligning it carefully. Using painter’s tape or clamps can help hold the trim in place as the adhesive cures, which typically takes 24 hours for full strength. During this time, avoid putting pressure on the trim to prevent misalignment. After the adhesive has set, you can touch up the area with paint or finish to hide any remaining seams or minor imperfections.

Loctite PL Premium Polyurethane Construction Adhesive, 10 fl oz Cartridge, 1 Pack – Versatile Construction Glue for Wood, Concrete, Stone, Metal & More
- All-Purpose Adhesive: Bonds to most materials for various projects
- Three Times Stronger: Offers 3x the strength of standard adhesives
- Versatile Use: Suitable for wood, concrete, metal, and more
As an affiliate, we earn on qualifying purchases.
As an affiliate, we earn on qualifying purchases.
Frequently Asked Questions
Can I Reattach Mouldings Without Damaging the Paint?
Yes, you can reattach mouldings without harming the paint. Use painter’s nails or adhesive strips to avoid nail removal marks. If you need to remove nails, do so carefully and touch up the paint afterward to hide any marks. To prevent damage, apply painter’s tape along the edges before nailing or gluing, and ensure the surface is clean and smooth. This way, your mouldings stay secure without ruining your paint job.
What Tools Are Best for Invisible Nail Removal?
For invisible nail removal, you should use nail removal techniques that minimize damage. A putty knife or a thin pry bar works well to gently loosen nails without harming the surrounding paint. Tool recommendations include a pry bar or flat-head screwdriver, which help lift nails carefully. You might also consider a nail puller or cat’s paw for more stubborn nails. Always work slowly to avoid damaging the molding or trim.
How Do I Match New Trim to Existing Mouldings?
Matching new trim to existing mouldings can feel like finding a needle in a haystack, but it’s doable. First, take a sample of the trim to a paint store and match the paint color precisely. Pay attention to the trim’s finish and sheen. When installing, make certain the new trim’s style and profile align with the existing mouldings for a seamless look. Consistency in paint and style makes your project shine.
Is There a Difference Between Glue Types for Trim?
Yes, there’s a difference between glue types for trim. You want an adhesive with strong adhesive strength to hold the trim securely, especially over time. Consider the drying time too; quick-drying glues offer faster results, but some might need longer to cure fully. For best results, choose a high-quality construction adhesive that balances strong adhesive strength with an appropriate drying time, ensuring your trim stays firmly in place.
How Long Does the Adhesive Take to Fully Cure?
You’ll want to know that adhesive curing times vary, but most take about 24 hours to fully cure. While drying time might be just an hour or two, true curing involves chemical bonds strengthening over time. Don’t rush it—allow your adhesive enough time to cure properly, ensuring your trim stays firmly in place. Patience now means fewer problems later, giving your project a flawless, professional finish.
Conclusion
Now, as you carefully press the moulding back into place, imagine the seamless wall once more, where each nail disappears like a whisper in the wood. Your patience restores the trim’s smooth grace, hiding every nail hole beneath fresh paint or stain. The room feels renewed, as if the moulding has simply grown there again, perfectly attached. With each step, your craftsmanship brings a quiet beauty, leaving your space flawless and inviting—ready for the next moment of your home’s story.