To fix loose cabinet knobs and pulls, first check if the screws are the right length—too short or too long can cause wobbling. Remove the hardware, tighten the screws, or replace stripped ones with slightly longer variants. Be sure to drill any necessary new holes carefully, using the right-sized drill bit. Tighten everything firmly but avoid overtightening. If it still feels loose, continue exploring ways to secure the hardware for a long-lasting fix.
Key Takeaways
- Remove the knob or pull and inspect the screw, replacing or tightening if loose or stripped.
- Measure the cabinet door or drawer thickness and select screws of proper length for a secure fit.
- Drill new or enlarged holes using a drill bit slightly smaller than the screw shaft to ensure a snug fit.
- Tighten screws until hardware feels secure but not overtightened to prevent damage.
- Consider using anchors or washers for added stability in soft or damaged materials.
Loose cabinet knobs and pulls can be both frustrating and unsightly, but fixing them is a simple task you can do yourself. The first step is to assess the hardware and determine whether the screws are too short or too long, which often causes the wobbliness. When you’re ready to tighten or replace the screws, pay attention to drill bit selection and screw length choice, as these details make all the difference.
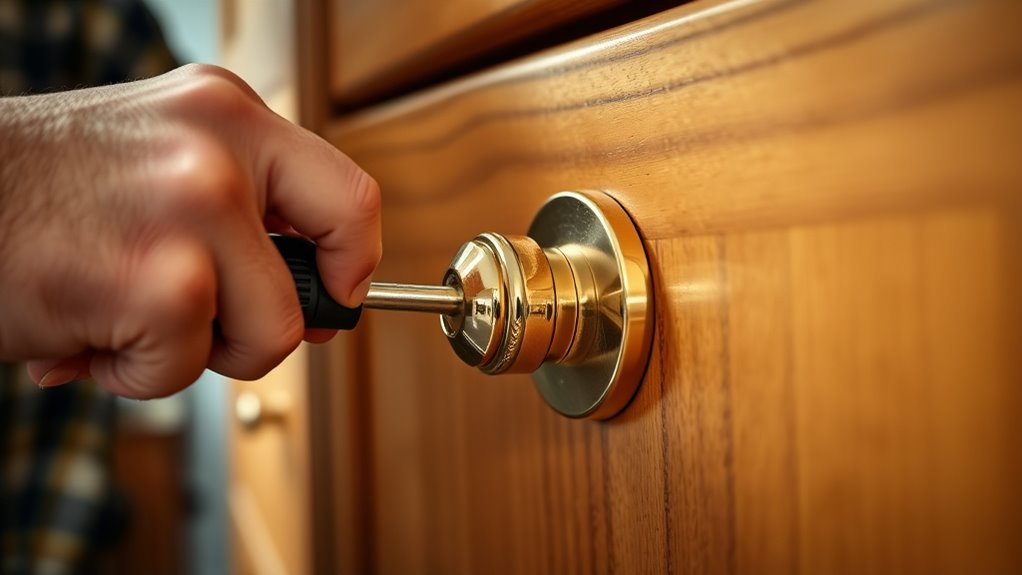
Start by removing the knobs or pulls. Usually, they’re held in place by a single screw from the inside of the cabinet door or drawer. Once you’ve located the screw, check whether it’s stripped or just loose. If it’s stripped, replacing it is necessary. If it’s simply loose, tighten it with a screwdriver. But before you do, consider whether the screw length is appropriate. Too short, and it won’t secure the hardware firmly; too long, and it may damage the cabinet or protrude awkwardly. To determine the right length, measure the thickness of the cabinet door or drawer front and add about a quarter-inch for a secure fit. When in doubt, opt for a slightly longer screw, but be cautious not to overdo it.
Next, if you decide to replace the screw, choosing the correct drill bit for the new screw is essential for a clean, professional finish. Use a drill bit that matches the screw’s diameter—generally, a bit slightly smaller than the screw’s shaft is ideal. This allows the screw to grip the material securely without splitting it. If you need to drill a new hole or enlarge an existing one, do so slowly and carefully, applying steady pressure. Make sure the drill bit is sharp and appropriate for your cabinet’s material, whether wood or composite. This helps prevent splintering and ensures a snug fit. Additionally, selecting the right power tool accessories can help achieve a better result.
When tightening or installing the new screw, don’t overtighten—this can strip the hole or crack the cabinet material. Instead, tighten until the knob or pull feels secure but still moves slightly if necessary. Afterward, check the hardware’s stability by gently tugging on it. If it still feels loose, double-check the screw length and tightness. In some cases, using a small piece of wood or a plastic anchor behind the screw hole can provide extra stability, especially if the material is soft or damaged.

WELLOCKS Cabinet Pulls Knobs Screws M4 25-50mm 100 PCS Assortment Machine Screws Pan Washer Head Metal Phillips Screws Kit for Cabinet Drawer Cupboard Closet Handles Install(D150)
UPGRADED UNBREAKABLE STORAGE CASE – NO MORE BROKEN PACKAGING Upgraded case with built-in latch, thickened material to 0.084"…
As an affiliate, we earn on qualifying purchases.
As an affiliate, we earn on qualifying purchases.
Frequently Asked Questions
How Often Should Cabinet Hardware Be Checked for Looseness?
You should check your cabinet hardware for looseness every 3 to 6 months as part of regular hardware maintenance. Regular inspections help guarantee cabinet safety by preventing knobs and pulls from falling off or causing injury. If you notice any loose hardware, tighten it promptly to avoid further damage. Staying proactive with hardware maintenance keeps your cabinets secure and maintains their overall appearance and functionality.
Can I Replace Cabinet Knobs Without Removing the Entire Door?
You can swap out cabinet knobs without removing the entire door—just loosen the existing hardware and replace it with decorative hardware or replacement options. It’s a quick fix that lets you change up your cabinet’s look without a full overhaul. Just keep in mind, if the screws are hard to access, you might need a small tool to tighten or replace the knobs smoothly. Easy as pie!
What Tools Are Needed for Tightening Cabinet Pulls?
You’ll need a screwdriver, typically a Phillips or flat-head, depending on your cabinet pulls. Use the appropriate screwdriver type to prevent stripping screws. To tighten, hold the pull firmly, then turn the screw clockwise with steady pressure. Apply even tightening, but don’t overtighten, to prevent damage. Regularly check the pulls after tightening to ensure they stay secure, adjusting as necessary using proper tightening techniques.
Are There Different Types of Screws for Various Cabinet Materials?
You might think all cabinet screws are the same, but different cabinet screw types suit various materials and hardware fastening methods. For example, wood screws work best for wooden cabinets, while metal or sheet metal screws are ideal for metal or laminate surfaces. Using the correct screw type guarantees a secure fit and prevents damage. Always match the screw type to your cabinet material for reliable, long-lasting results.
How Do I Prevent Future Loosening of Cabinet Hardware?
To prevent future loosening of cabinet hardware, you should perform regular hardware maintenance by tightening screws periodically. Use the right type of screws for your cabinet material during DIY repairs, which helps guarantee a secure fit. Consider applying a small amount of threadlocker for extra hold. Avoid over-tightening, as it can damage the hardware or the cabinet. Consistent checks and proper installation are key to maintaining tight, secure cabinet hardware over time.

Cabinet Hardware Jig, King&Charles Cabinet Handle Jig with Automatic Center Punch, Avoid Jitter Caused by Direct Drilling. Use for Handles and Pulls on Drawers/Doors, Perfect Set.
⭐【Unique Advantages】- In order to avoid drilling directly with an electric drill will cause the jig to shake,…
As an affiliate, we earn on qualifying purchases.
As an affiliate, we earn on qualifying purchases.
Conclusion
Now that you’ve tightened those loose knobs and pulls, your cabinets are ready to shine like stars in a clear night sky. No more wobbling or rattling—just smooth, confident openings and closes. Think of your cabinets as a well-orchestrated symphony, each piece in perfect harmony. With these simple fixes, your furniture’s charm is restored, turning a wobbly mess into a masterpiece. Keep your tools handy, and your home will stay as polished as a gem.

JEGONFRI High Hardness Wood Screws Assortment Kit, 209 pcs, Phillips Drive Flat Head, Wood Screws, Screws, Drywall Screws, Assorted Screws, Screws Set, 6 Sizes (2”,1-1/2”,1-1/4”,1”,3/4”,1/2”)
Various Size: A portative kit includes 6 sizes(#8 x 2 in, #8 x 1-1/2 in, #6 x 1-1/4…
As an affiliate, we earn on qualifying purchases.
As an affiliate, we earn on qualifying purchases.
WELLOCKS Cabinet Pulls Knobs Screws M4 25-50mm 100 PCS Assortment Machine Screws Pan Washer Head Metal Phillips Screws Kit for Cabinet Drawer Cupboard Closet Handles Install(D150)
UPGRADED UNBREAKABLE STORAGE CASE – NO MORE BROKEN PACKAGING Upgraded case with built-in latch, thickened material to 0.084"…
As an affiliate, we earn on qualifying purchases.
As an affiliate, we earn on qualifying purchases.