To create a live-edge river shelf on a budget, select a wood piece with interesting grain and natural contours, then sand it smooth. Use inexpensive pigments like craft dyes or food coloring mixed into epoxy for vibrant accents. Pour thin layers of epoxy, filling cracks and crevices to enhance the wood’s natural beauty. Finish with a topcoat and proper sealing. For detailed steps on achieving professional results affordably, keep exploring these techniques.
Key Takeaways
- Select a smooth, interesting live-edge wood board with prominent grain patterns and natural contours for visual impact.
- Sand thoroughly from coarse to fine grit to achieve a silky surface ready for epoxy application.
- Use inexpensive pigments like food coloring or craft dyes to create vibrant, translucent epoxy fills for cracks and lines.
- Pour epoxy in thin layers, allowing each to cure fully to build depth and highlight natural wood features.
- Finish with light sanding, sealing, and protective topcoats to enhance durability, shine, and the overall aesthetic.
Creating a stunning live-edge river shelf doesn’t have to break the bank. With some basic tools, patience, and a little creativity, you can craft a beautiful piece of functional art that enhances your space. The key is understanding how to work with wood grain and epoxy coloring, as these elements truly define the aesthetic of your shelf. You don’t need expensive materials; instead, focus on choosing the right wood and mastering simple epoxy techniques to achieve a professional look.
Create stunning live-edge shelves using simple epoxy techniques and budget-friendly materials.
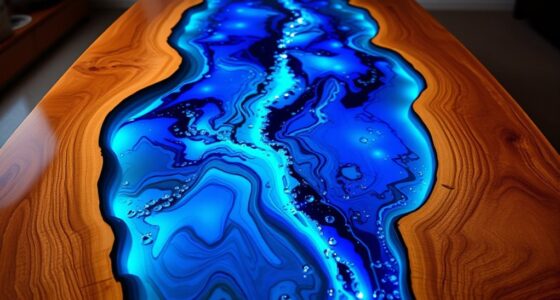
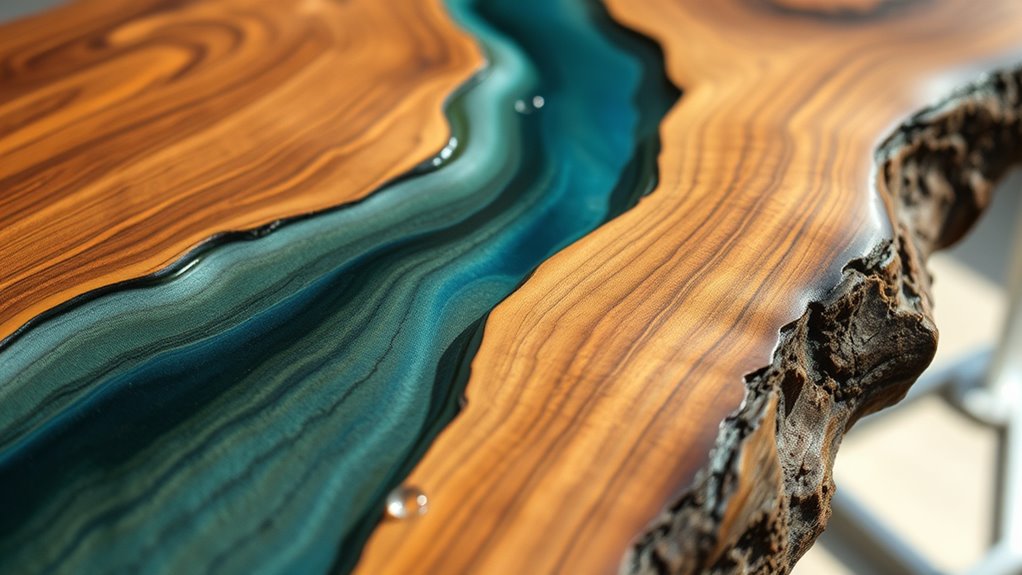
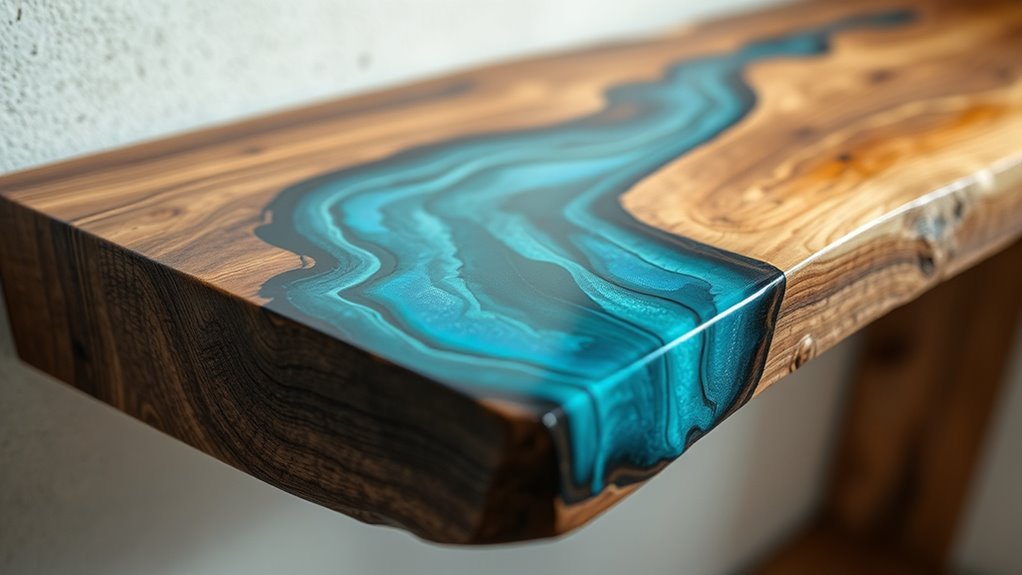
Start by selecting a piece of wood with an appealing live edge—look for grain patterns that catch your eye, like swirling lines or rich knots. The wood grain sets the tone for your project, so pick a board that complements your décor and has a smooth, even surface for easier work. Once you’ve picked your wood, sand it thoroughly, starting with coarse grit and progressing to finer grits, until the surface feels silky smooth. This step lays the foundation for a flawless epoxy finish.
When it comes to epoxy coloring, the secret is to keep things simple but impactful. You don’t need high-end pigments; food coloring, craft dyes, or even acrylic paints diluted with epoxy resin work well for budget-friendly options. Mix your epoxy resin according to the manufacturer’s instructions, then add your chosen colors gradually, stirring well to achieve a vibrant, translucent hue. For a river effect, pour the epoxy in the center of the shelf, allowing it to fill the natural crevices and follow the wood’s contours. Use a heat gun or a small torch to pop any bubbles and encourage a smooth, glassy finish.
As you work with epoxy, pay attention to the wood grain. Let the epoxy flow into the natural lines and cracks, accentuating the unique patterns of your live edge. You can create a layered look by pouring multiple thin coats of epoxy, allowing each to cure before adding the next. This technique adds depth and richness to your shelf, making it look more professional without spending extra money on complex molds or special additives.
Finally, once everything is cured and hardened, sand the surface lightly with very fine grit to remove any imperfections, then apply a protective topcoat if desired. This not only enhances the shine but also seals the epoxy and wood, ensuring your river shelf remains stunning for years. Paying attention to sustainable woodworking practices can also help reduce environmental impact during your project. With patience and attention to detail, you’ll end up with a gorgeous, budget-friendly live‑edge river shelf that highlights the beauty of wood grain and epoxy coloring—an impressive piece that’s both personal and affordable.

POWERTEC 70306 4 Inch Dust Collection Fittings Network with Dust Hose Splice, Blast Gates, Pipes, 90-Degree Elbow Connector, Y-fittings, Mounting Brackets
INCLUDES: (5) dust collection blast gates, (1) splice, (4) 3ft dust collection pipes, (4) y-fittings, (1) 90-degree elbow,...
As an affiliate, we earn on qualifying purchases.
Frequently Asked Questions
What Types of Wood Are Best for Live-Edge River Shelves?
When choosing wood for your live-edge river shelf, you want to focus on wood grain and epoxy color. Hardwoods like walnut, maple, or cherry are excellent because their tight grain enhances durability and visual appeal. These woods also contrast beautifully with vibrant epoxy colors, creating a striking river effect. You’ll find that selecting the right wood grain pattern and epoxy color makes your shelf both sturdy and stunning, perfect for your space.
How Long Does the Epoxy Curing Process Typically Take?
When wondering about epoxy curing time, you should know that epoxy drying usually takes about 24 hours, but full curing can take 72 hours or more. It’s important to prevent touching or stressing the surface during this period to guarantee a strong, clear finish. Factors like temperature and humidity can affect curing time, so follow the manufacturer’s instructions carefully for the best results in your project.
Can I Customize the Color of the Epoxy River?
Imagine painting your dreams into reality—yes, you can customize the epoxy river’s color. With epoxy tinting, you have endless options for color customization, allowing you to match or contrast your decor beautifully. Simply add pigments or dyes to your epoxy before pouring, and watch your vision come alive. This creative process makes your project uniquely yours, turning a simple table into a stunning, personalized masterpiece.
What Safety Precautions Should I Follow During Epoxy Application?
When applying epoxy, you should prioritize safety by wearing personal protective equipment like gloves, goggles, and a respirator to prevent skin contact and inhalation of fumes. Make certain proper ventilation safety by working in a well-ventilated area or using fans to disperse vapors. Always follow the manufacturer’s instructions, avoid open flames, and clean spills immediately. These precautions help safeguard your health during epoxy application.
How Durable Is a Budget Epoxy River Shelf Over Time?
You get what you pay for, so a budget epoxy river shelf’s durability depends on your application. While it resists epoxy wear initially, over time, wood aging can cause the shelf to loosen or crack if not properly sealed. With proper maintenance, it can last several years, but keep in mind, cheaper epoxies may need more touch-ups. Regular care helps extend its lifespan and keeps it looking beautiful.

CREALITY FALCON 10w Laser Engraver with Air Assist, Laser Engraving Machine with Rotary Roller, 72W High Precision Laser Cutter and Engraver for Wood, Metal, Acrylic, Cylindrical Objects, Tumblers
【Work Higher Productivity】 The laser engraver provides 10000mW output power and laser class 4, which can cut a...
As an affiliate, we earn on qualifying purchases.
Conclusion
As you finish your live-edge river shelf, it’s almost unbelievable how a simple epoxy technique brought this stunning piece to life. Coincidentally, the same budget supplies you used can be applied to other projects, making creativity affordable and accessible. Now, every time you glance at your custom shelf, you’ll remember how a clever idea and a little patience turned a basic materials into a work of art—proof that beautiful craftsmanship is within everyone’s reach.

Creality Laser Engraver Machine 10W Output Power, 72W DIY Laser Engraving Machine 0.06mm High Precision Laser Cutter and Engraver for Wood and Metal, Paper, Acrylic, Glass, Leather etc, 17" x 16"
SPEEDY POWERFUL 10W OUTPUT - Creality Class Ⅲa laser engraver machine has 72000mW machine power and 10W output...
As an affiliate, we earn on qualifying purchases.

ACMER S1 Laser Engraver, 2500mW Laser Engraver Machine Higher Accuracy Lazer Cutter and Engraving Machine with Working Area 130x130mm,0.04mm Laser Spot Engraving Machines & Tools
Fr*e AcmerTool Engraving Software Included: The engraver is fully optimized for AcmerTool, our self-developed engraving software, which is...
As an affiliate, we earn on qualifying purchases.