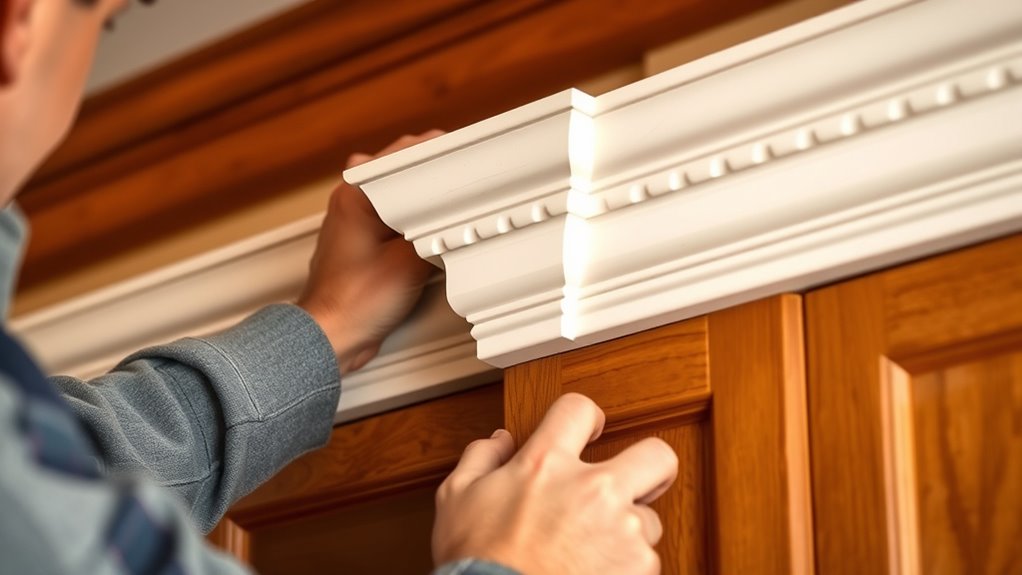

To install crown molding on cabinets, start by measuring each corner carefully, accounting for the spring angle, which is vital for a perfect fit. Use a miter saw to cut the molding at accurate angles, often using copes for internal corners and bevels for external ones. Sequence your cuts from one corner to the next, double-checking measurements along the way. Paying close attention to spring angles guarantees seamless joints—keep going to discover the detailed steps for professional results.
Key Takeaways
- Measure and record the cabinet’s spring angle accurately using a digital angle finder or standard tools.
- Determine the correct miter and bevel cuts based on the measured spring angle for seamless joints.
- Install crown molding starting from external corners, making precise miter cuts aligned with the cabinet’s angles.
- Use a miter saw to cut crown molding at the correct angles, ensuring proper sequencing around corners.
- Double-check fit and make adjustments before securing to ensure a professional, seamless appearance.

Have you ever wondered how to give your cabinets a polished, finished look? Installing crown molding can elevate your cabinetry, but it requires careful planning and precise execution. The first step is understanding measurement techniques and tool selection, which are vital to achieving seamless joins and professional results. Accurate measurements ensure the molding fits perfectly, avoiding gaps or overlaps that can ruin the aesthetic. When measuring, you want to account for the spring angle of your crown molding, the angle at which it will sit against the ceiling and cabinet top. Using a combination square or a dedicated crown molding angle square helps you determine the correct angles and length of each piece. These tools make it easier to mark cut lines precisely, especially when dealing with internal and external corners.
Accurate measurement and proper tools ensure seamless crown molding installation for a professional finish.
Choosing the right tools is indispensable for a smooth installation. A miter saw with adjustable angles simplifies cutting at precise degrees, especially when working with complex cuts like copes or beveled edges. A smart tool choice also includes a measuring tape, a pencil for marking, and a level to ensure your crown molding sits evenly. For intricate cuts, such as spring angles that are not standard 45 or 90 degrees, a digital angle finder can be invaluable. This device allows you to measure the exact angle of your ceiling or cabinet top, which guides the miter cuts needed for a perfect fit. Remember, the goal with measurement techniques is accuracy; take multiple measurements before cutting, and double-check your marks to avoid errors.
Additionally, understanding industry trends can help you select the most suitable crown molding profile to match your decor style. When you’re ready to cut, set your miter saw to the appropriate angles based on your measurements. For external corners, you’ll generally make bevel cuts, and for internal corners, coped joints are often preferred because they create a cleaner look. To cope a joint, you’ll cut along the profile of the molding, then trim it to fit snugly against the adjoining piece. This process demands precise measurement of the angle and the length of each piece, which is why tool selection and measurement techniques go hand-in-hand. Proper measurement and the right tools help you minimize waste and reduce the need for adjustments after installation.
In essence, mastering measurement techniques and selecting the appropriate tools streamline your crown molding project and lead to professional-looking results. Taking your time to measure carefully and choose the right equipment ensures your crown molding complements your cabinets perfectly, giving your kitchen or space a sophisticated, finished appearance.
digital angle finder for crown molding
As an affiliate, we earn on qualifying purchases.
As an affiliate, we earn on qualifying purchases.
Frequently Asked Questions
What Tools Are Essential for Installing Crown Molding?
You need a few essential tools for installing crown molding. A miter saw helps with precise cutting, especially when using measuring techniques for angles. A tape measure guarantees accurate length measurements, while a square helps check angles. A coping saw is useful for detailed cuts. Don’t forget a nail gun or hammer to secure the molding. These tools make it easier to achieve a professional look by ensuring accurate cuts and proper fit.
How Do I Choose the Right Crown Molding Style?
You should choose a crown molding style that complements your decor styles and matches your material options. For a traditional look, opt for ornate designs, while modern spaces benefit from sleek, simple profiles. Consider the material options like wood, MDF, or polyurethane for durability and ease of installation. Pick a style that enhances your cabinets without overwhelming them, ensuring cohesion with your overall interior design.
Can Crown Molding Be Installed on Uneven Cabinet Surfaces?
Your cabinets aren’t a mountain range, so yes, you can install crown molding on uneven surfaces. To tackle cabinet surface irregularities, you’ll need to customize your approach with uneven molding installation. Use shims and sanding to create a level base, then carefully cut and fit your crown molding. This guarantees a seamless look despite the imperfections, making your project look professional even on the most wonky cabinet surfaces.
What Are Common Mistakes to Avoid During Installation?
You should avoid common mistakes like neglecting measurement accuracy and sacrificing cutting precision. Always double-check your measurements before cutting to make certain the crown molding fits perfectly. Use a miter saw with a sharp blade for precise cuts, and don’t rush the process—measure twice, cut once. Carefully align pieces during installation to prevent gaps or misfits. Paying attention to detail will give your project a professional look.
How Do I Finish and Paint Crown Molding for a Professional Look?
To finish and paint crown molding for a professional look, start with proper finishing techniques like sanding smooth surfaces and filling gaps. Use high-quality paint and apply it with a brush or roller, ensuring even coverage. For a flawless finish, consider applying a primer first. Take your time to cut in neat edges, then add an extra coat if needed. Proper paint application and attention to detail make all the difference in achieving a polished result.
Conclusion
Think of installing crown molding like finishing a puzzle—you need each piece to fit perfectly. When I first started, I struggled with spring angles, but once I understood their role, everything clicked into place. Now, every cabinet feels like a masterpiece. With patience and the right sequencing, you’ll transform your space just like I did—turning simple cabinets into stunning built-ins. Remember, every detail matters, and the final result is worth every careful cut.